Tag Archives: Tires

Under pressure

External TPMS sensor

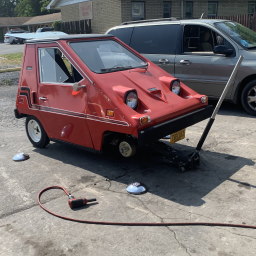
The TPMS monitor arrived. The packaging looked like it was opened along the way going through customs.

It was fairly easy to install. Replace tire stem caps with little knobs. An alarm went off almost immediately as I put one on. I changed the units of measurement so the pressure and temperature were set to PSI and Fahrenheit.

TPMS host display

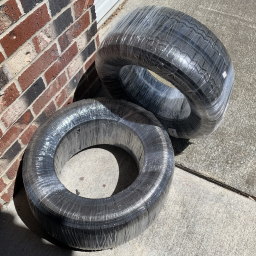
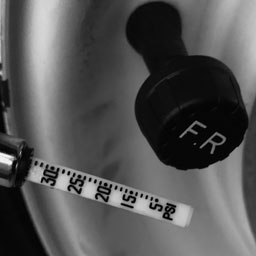
My tires were setting around 20 psi. The maximum pressure for the tires is rated at 51 psi.

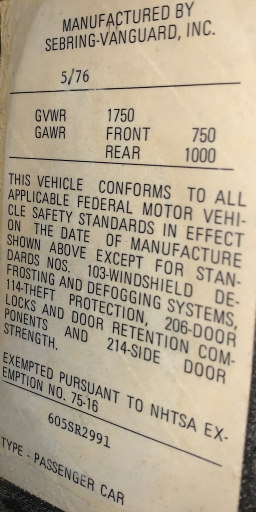
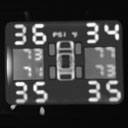
I did some quick research and found most cars have a pressure around 32 psi, and that the door should have a sticker with the recommended tire pressure. I only saw the sticker with the VIN on it. I dug through the owners manual and found that Sebring-Vanguard recommended a tire pressure of 32 psi. Inflated the tires to 35 psi.

RECOMMENDED TIRE PRESSURE

The recommended tire pressure for standard and radial tires, front and rear is 32 psi. A lower tire pressure will give a softer ride, but a lower speed and ranger a higher tire pressure gives better speed and range.

CitiCar 1976½ Owners Manual, Sebring-Vanguard page 24

Power Transmission

Along with receiving the majority of parts by the end of next week, I’ve been researching battery cables. The first thing was to identify the amps going through everything.

DeviceAmpsPeak
Charger2020
Battery Monitor350500
4 Battery Modules4 * 250
1000
4 * 400
1600
Battery Switch350
600@5 min
1200@30 sec
1200
Fuse400400
Contact Solenoid650650
Motor Controller380
420@5 min
500@2 min
575
Reversing Contactor400400
Motor52-584584
Max Amps Allowed350400
Amperage that devices can produce, handle, or draw in the circuit

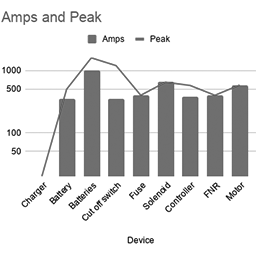
The fuse does not allow any more than 400 amps supplying the motor. From here, I was able to get a general idea of how large the battery cables need to be.

In addition to amps, I also had to take voltage drop into consideration. To do this, you need to know the length of the full path in circuit – battery to motor, and back again. I took some string and laid it out in a large loop around the bench seat. It came out to roughly nine feet.

The parameters are 48 volts @ 400 amps running along nine feet of cable. I found a calculator and put in the following:

InputValueCalculated
MaterialCopper
Gauge2/0 AWG
00 AWG
Voltage48 VDC
1-way circuit length4.5 feet
Load400 amps
0.288 VDCVoltage Drop
47.712 VDCVoltage at Load
0.6%Voltage Drop
133100
circular mils
Wire cross section

It appears 2/0 AWG wire will handle the maximum load the fuse will allow with a minimal voltage drop.

In other resources, I’m finding that 00 gauge is often rated for a maximum current of 186 amps, and that you should never exceed 80% of the rating (148.8 amps). Even a 4/0 wire will only be rated for 380 amps max.

In this scenario, it feels like the wire will melt before the fuse breaks. Things that confuse me are that the information that I’m finding is often for bringing electric into a house. I often look at how golf carts are wired up, but they are often working with 2 AWG wire, which is much smaller than 2/0 AWG.

To support 400 amps, I think I would need 500 kcml / 500 mcm of copper wire rated for 90°C. It looks like it costs roughly $14/foot. The wire is thick – as in power lines on telephone poles. I wouldn’t have the ability to afford tools to cut, crimp, and bend the stuff. Besides speed, I think modern EV’s go with higher voltage systems to reduce the amps needed, thus reducing the size of the wire.

The motor controller supports current limiting, so I could force it to use no more than 148.8 amps if I desired.

Someone local that I met on the maiden voyage has a few tools and supplies to help out with that they had used on their own EV.

In other news

  • D & D Motor Systems is shipping my motor.
  • Popular Science, June 1975 has been shipped
  • The portable EVSE has been shipped
  • I need to do some research on plug breaking / dynamic braking
  • I may need to contact D & D Motor Systems or Alltrax to see if they have a field map for my specific motor / controller.

Advertisement

Stock Radials

After having the extra set of tires that came with the car mounted, I noticed the CitiCar had a much smoother ride with radial tires. Unfortunately, I could hear them rub as I turned into my driveway while the car experienced a little bump.

It was time that I get serious and invest in the stock size that the car was intended to operate with. The consumer information 1976 CitiCar sheet that the original dealer provided with the CitiCar had recommended tire sizes of 4.80×12 inches and 125-SR12-ZX. My current tires (155/80R12 77T) are an inch too wide. They are a bit larger in diameter as well. One of the members on a CitiCar and Comuta-Car group had just gotten some tires for his car recently, and I went ahead and ordered the same set for myself.

New tires arrived for the CitiCar

I got a set of Michelin X 125R12 (SKU: 51198) from Coker Tire

It didn’t take long before I noticed they arrived at my doorstep while I was leaving the house. It felt like Christmas looking at those wreaths. I stored them in the garage for a few days until I was ready to get them mounted.

The big day came. The tires were small enough that I was able to fit all of them in the back of the cheese mobile. I drove over to Advanced New & Used Tires and they were able to work on the car as soon as I got there.

We talked a bit about the car regarding its history, maintenance, and its value regarding costs as a hobby versus the actual value someone would pay. I think he may have been considering purchasing the CitiCar, but I made it clear that it wasn’t for sale.

It wasn’t long before they were done mounting the new tires, and they knocked $20 off for coming back so soon. My garage is now storing two sets of unused tires.

I no longer hear rubbing when turning into my driveway, and the tires are still smoother than the original tires that came on the car.

Label on side of CitiCar dash with
Gross vehicle weight rating
and gross axle weight rating

One thing I noticed is that the maximum load weight is lower than the original tires, and previous set of tires. I had some concerns until I checked for the vehicles gross vehicle weight rating, and the calculated the sum of all tires.

Since the vehicles gross vehicle weight is less than the four tires combined. The sticker on the side of the dash indicates the front axle can support 750 lbs, and the rear supports 1000 lbs. My new tires can support both axles at their maximum weight load.

I’m assuming it’s fine. Also related to the weight of the car, lead acid batteries weight a lot. I believe around 600 lbs. I’m only using roughly half the battery capacity as the ones that originally came with the car. I’ll later be replacing the lead acid batteries with some lithium batteries I’ve purchased as well, which is even more lighter.

TiresSpeed RatingMax PSIMax LoadTotal Max Load
OriginalB: 31 mph60780 lbs3,120 lbs
Extra SetT: 118 mph44908 lbs3,632 lbs
New TiresS: 112 mph51584 lbs2,336 lbs
Gross Vehicle Weight1,800 lbs
Each set of tire statistics against the vehicle itself for comparison

I had started keeping a better track of charging time and voltages on the last trip. Based on the number of miles driven, I estimated that it would take eight hours to charge, and set an alarm for an hour earlier. Much to my surprise, the batteries were fully charged when the alarm went off.

WaypointOdometerDistance
Home1,084.2
Advanced New & Used Tires1,086.62.4
Home1,088.92.3
Total4.7
CitiCar odometer readings for a round trip to Advanced New & Used Tires
RechargeEnergyCostDuration
RatekWh9.85¢0.66 mph
Total1.31 kWh13.3¢07:09
Per Mile279 Wh2.8¢01:31
Cost to recharge the CitiCar batteries

Radial Tire Upgrade

Four new radial tires were thrown in with the sale of the CitiCar. After having my fun with the old tires, I decided it was time to take the car into a tire shop and have the new tires installed. I found a local shop nearby and called ahead to verify that they would install third party tires. They had a few questions, but the best way I could explain was – it’s a weird little car with trailer tires, along with the code of the new tires.

CitiCar jacked up by its front axle for tire installation.

There was only enough room in the back for two of the tires. The other two went into the passenger foot-well. While it was lifted on jacks, a few people waiting to be serviced came over to talk about the car, the manufacturers history, and current condition.

I got to see the drum brakes on the back of the car for the first time. They were dirtier and different than the front brakes. The adjustment access point faces out toward the tire, instead of being accessed from behind. The axle caps protruding from the center of the front rims were missing on the back two tires.

Once the tires were installed, the mechanic and I were able to put all four of the older tires into the back of the car. I took a look at the new tires on the car. Because they were a bit larger, I rotated them in both directions to verify that they didn’t rub against the cars body.

The bill came out to $60.90.

WaypointOdometerDistance
Home1,055.8
Advanced New & Used Tires1,058.22.4
Home1,060.52.3
Total4.7
CitiCar odometer readings for a round-trip to Advanced New & Used Tires from home
RechargeEnergyCost
RatekWh$0.0985
Total1.51 kWh15.3¢
Per Mile321 Wh3.3¢
Cost to recharge the CitiCar batteries