Tag Archives: Cables

Motor Wires

Most of yesterday and the entire day today was full of rain. I wasn’t able to get much done compared to Saturday. Most of the day has been spent planning, researching, and cleaning the garage.

Alltrax Wiring

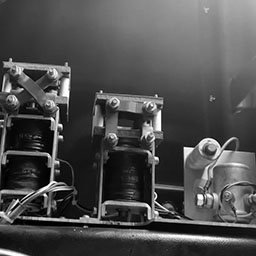
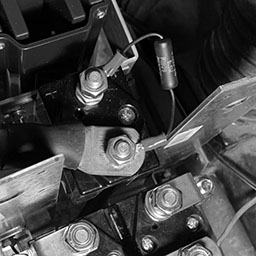
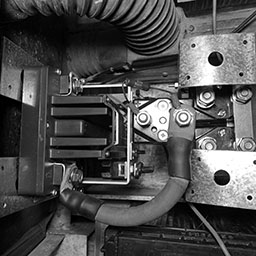
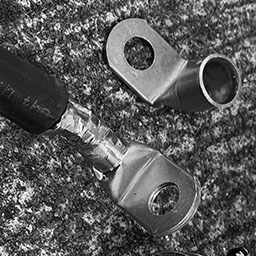
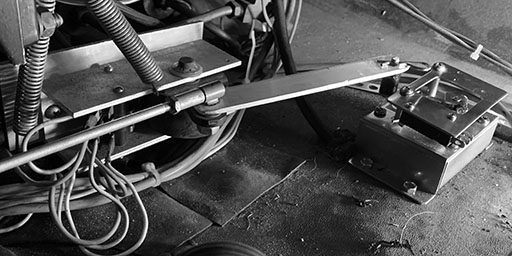
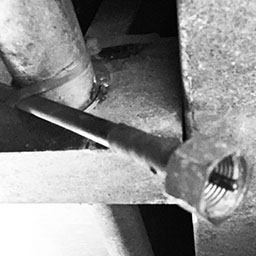
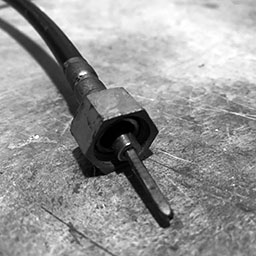
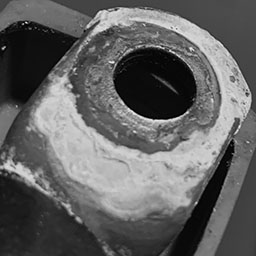
I’m working in a tight space with the motor controller, contactor, and motor. It’s difficult to bend thick cables, and harder to work with thick terminals overlapping each other.

I was in a tough spot with trying to get two wires connecting to the motor controller, and I was wondering if it was important that the wire from the motor goes to the controller, rather than directly to the contactor. Electrically, it didn’t seem to make much of a difference.

Alternative wiring proposal

C-Car and one DIY EV conversion owner said their controllers were wired up in this way. I sent an email out out the manufacturer.

Wiring Question

Hello.

I have an SR-72500 Motor Controller.

I am installing this in a CitiCar, which was previously controlled by applying 3 different voltages to the motor.

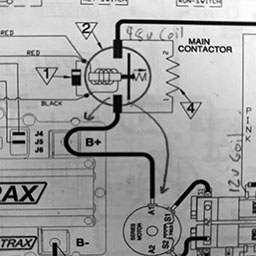
I’m looking at the Generic Series /w SW202 Reverse wire schematic in the operators manual SR (page 22)

On all diagrams in the manual, I see:
1 wire going from the SW180 contactor to the motor controller B+ terminal
1 wire going from the motor controller B+ terminal to the series motor A1 terminal

I’m working in a tight space and it’s difficult to get two lugs onto the B+ terminal.

Can I have the wire to the motor come directly from the SW180 contactor? These are the changes I am proposing:

keep 1 wire going from the SW180 contactor to the motor controller B+ terminal (no change)
add 1 wire going from the SW180 contactor to the series motor A1 terminal
remove 1 wire going from the motor controller B+ terminal to the series motor A1 terminal

The Answer

Technically speaking it will work, electrically speaking you’re going to cause an issue doing that. If this was a low current system, like a stereo then this would be fine, but since we’re low voltage high current we have to know where current is at all times. So when you put the two wire connection on the solenoid it turns the motor and controller into two separate loads the moment the solenoid closes and both are fighting to get the current coming out. Motor is bigger, it gets the current, and the controller just watches things happen without doing its job.

If you wire it that way, it will operate though, it may just do some weird things randomly.

I was taken back a bit. I half expected a basic answer of something along the lines of – only wire it the way we say to do it. This person went into detail of “WHY” with a simplified explanation. It’s exactly the answer I needed. I actually feel like I learned something.

I posted the manufacturers response on the Facebook post for the other C-Car owners to learn about as well.

Motor Cables

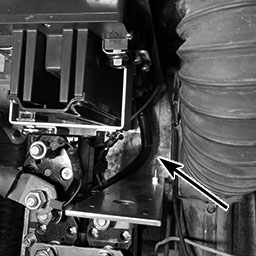
Yesterday I was able to put some cables onto the motor, switches, and controller. I wired up the main contactor solenoid to the motor controller and a small switch as a safety measure to prevent the solenoid from being activated while working on it.

The main contactor was flipped to allow the cable to the controller to be made shorter. The suppression diode was too close to the metal mount for the SW202 switch, so I bent it into a new shape that actually made it a bit more ridged and let me get my hands down into the area much easier.

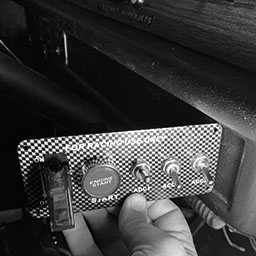
I also started to setup a couple relays to allow 12 volts to pass to either side of the SW202 switch based on if the car is going in forward or reverse. While I was at it, I started labeling the wires so it would be easier to figure out how to connect everything up once I started running wires from the dashboard.

Cables installed allowing power to transfer between the main contactor, motor controller, motor reversing switch, and the motor.

Search for Parts

I found that out of 10 colors of automotive wire, I didn’t have pink. Pink is used to identify power for “reverse”. I went to a hardware, automotive, and farm supply store and couldn’t find the following:

  • Pink automotive wire
  • Relay with a 12v coil to pass 48v over the switch (actually, I couldn’t find any relays)
  • Battery side wall terminal

I’ve never really looked around an automotive store in the past. Usually I order something online and go to pick it up. I was shocked at how little the store seemed to have.

Gutting Old Parts

I pulled out the 48 volt and 12 volt battery chargers. I started removing all of the loose wires inside the battery compartment under the seat. I’ve got three of the original wires unthreaded from most of the zip ties leading to the front of the car. I was starting to run into a difficult time in the front part of the car.

The vent from the motor to the flap has been removed. I need to determine how to heat and defrost the car now that the motor can not support it.

Lithium Ion

Four battery modules from a 2015
Chevy Volt can fit into the CitiCar

I placed all four lithium battery modules in the car and found that I had enough room to place the battery charger under the seat as well. I’m considering the best placement while considering where the J-1772 inlet can be installed.

The battery modules had little nubs on the side that prevented them from sitting flush against the car. I cut them off and they now sit flush, giving an extra quarter inch to the space available beside them. I also noticed that the two newer chargers are missing the black cable that connects to the battery charger. I’ve been thinking about mounting some small angle brackets to the bottom of the battery box to prevent the modules from moving around while driving.

I’m still thinking about how to connect the four batteries. Each terminal is difficult to reach with the thick 2/0 wire terminals. I was considering adding a terminal fuse to each battery to have something to bolt onto for easier access. I also saw a copper butt seam flag connector as well that might work, letting me create two large wires rather than 10 smaller ones to connect them all together.

Advertisement

Motor Replacement

Ramps jack up the front quickly

The majority of the day was spent replacing the stock General Electric 48 volt motor with the ES-40D-56 from D & D Motor Systems. A local CitiCar enthusiast handed me a set of ramps from his garage, and it helped make the process of jacking up the car a bit quicker.

The first thing I did was to dethatch and remove the lead acid batteries.

A little boo boo from the motors weight

The process of taking the motor off of the car went pretty quick. I was aware of the seal that I had the break, and that I would have to be ready to catch differential fluid. Just like last time, the final step of lowering the motor from the car proved to be a bit difficult. My pinky finger ended up being crushed for a brief moment with 60 pounds of copper.

I had a question that I shot over to the C-Car community in how I could add the intake vent onto the new motor. In the meantime, I moved to the next thing I could tackle.

Removing cables

I started removing every battery and motor cable from the car. I was surprised to find that the main fuse for the motor itself was almost blown. Rather than one, the car had two separate fuses. One of the 250 amps fuses had already blown, and the second was on its last leg.

Fuse labeled as 250V. EAGLE UND LAB LIST 250A

Driving with only one semi-in-tact fuse is a bit concerning. I’ve seen the amps around 250 when starting to go up a hill, and once spiked at 350 amps. If I had continued to drive around with these fuses, I would shortly find myself in quite a pickle.

Controller Nostalgia

Although the motor controller no longer had any of the thick cables connected to it, I was able to confirm that the contactors would activate as I pressed down on the accelerator. I was delighted at the results and decided to keep the contactor.

The main contactor, series contactor, and reversing contactor tower

I’ve got a little project after the conversion to set up a special “user mode” that will activate the contactors while mimicking the original speed jumps/jerking with the motor controller.

Air Intake

I got a few conflicting responses, but the general consensus was that cutting into the case itself would compromise the integrity of the motor. I settled for drilling a few holes into the side of the motor plate, and threading two on the face to attach the original intake.

A rotary tool is used to cut bolts flush with the motor plate

I didn’t attach the vent for air to exit the motor. The D&D Motor has holes along the entire circumference on the other end of the motor. Another approach is needed to evaluate if the air can be captured, or if a different heating source should be used to heat and defrost the CitiCar.

Mounting the Plate

Motor plate with gasket maker around the shaft and each bolt

A thin material was found between the differential and the original motor plate. There was a red sealant in some areas as well.

I cleaned it off with break pad cleaner and then used a gasket maker to draw an outline of silicon around the hole and the bolts.

Afterwards, I tightened everything by hand and let it sit for awhile before tightening with a ratchet.

Motor Bumper

The splined motor bumper

I learned previously that many golf carts often have a spline motor bumper rubber grommet that sits inside the shaft to reduce the vibration of the motor shaft hitting the metal. I didn’t find it in the CitiCar’s stock motor, so I picked one up. I covered it in some grease and stuck it down into the new motors shaft.

New Motor

The last part was actually installing the motor. It was simply lifting it up on the jacks and tightening some bolts. Once the motor was in, I lowered the car. Without any batteries, I pushed it into the garage.

The new D & D Motor Systems ES-40D-56 motor is nestled in its new home
CitiCar Motor Replacement

Bend Over Backwards

Fabricating Mounts

The A311 angle brackets are in the way of the cable in between them

Yesterday I was about to work on running a cable from the main contactor to the Alltrax motor controller B+ terminal. I was using one of the short wires that I received from a local enthusiast of CitiCars. The A311 angles were in the way when trying to bend the wire.

A311 angle brackets bent over to allow cable to pass over them

I spent a great deal of time bending the tops down backwards over the SW202 motor reversing switch. Part of the problem was bending the brackets while they were still in the car. The other part was that I just didn’t have the tools available to do it properly. It wasn’t easy, and it wasn’t clean, but I got the job done.

Now that the brackets are bent over, they provide an additional surface to mount things to. They seem a bit high in where they are bent. The cable itself is under too much stress. I’m reconsidering how to attach it in the most beneficial way.

Bending the mounting brackets

PlugShare

I’ve been using PlugShare to find charging stations. They let you pick your car from a list, but I had to choose “Other”, which just showed a tarp over a sedan. I sent customer support (Ticket #70359) a request a couple weeks ago to let me choose a custom name other than “Other”, along with my own image of the car.

They got back today and added a “Sebring Vanguard Citicar” option, and asked if it was compatible with J1772 connections, to which I replied:

Stock model from the 70s is only compatible with level 1 chargers. A lot of us CitiCar/Comuta Car owners have been modifying them with J-1772 adapters, lithium battery, and chargers that support up to 240v.

PlugShare app displying Sebring Vanguard CitiCar recognized as a type of electric vehicle

A few others on the C-Car Facebook group confirmed that they too were able to add their CitiCars and got a kick out of it with plenty of excitement. It feels like these little cars are getting a little bit of validation in their place in history.

Fuming Mad

TLDR; gas smells bad

Ramble

I haven’t been to a gas station since February. Partly due to the fact that my primary vehicles were inoperable for awhile. A dead battery due to just not driving the car, and the SUV had problems trying to shift it out of park. Both vehicles are up and running now.

I had an in-person doctors appointment and decided to take the hour-long trip in my car since it gets 45 miles to the gallon compared to my gas guzzling SUV. I only drive the SUV occasionally to keep the battery charged and to pull my RV – but camping is canceled during the pandemic.

Anyhow, I’m running on, getting off topic.

Fumes

So my car had maybe 70 miles left, so I stopped to get some gas. I could smell the gas station! I hadn’t smelled anything like that since I was a kid. I thought the smell went away when everyone switched to unleaded gasoline. And the smell was stuck on my hands afterwards.

So yea… I just found it curious.

Rant

Don’t sit behind a Ford Mustang GT at a drive through. The fumes and loud noises are unbearable. I just kept imagining how much money the driver was spending to get me high. Every drive-through has cars just idling, wasting gasoline. One of the largest parts of a car is dedicated specifically to making the engine quieter. The mustang had two tail pipes and it was still very loud when idling. It makes me wonder how much louder the engine could get without it.

Big Rebuild

Seeing the bare copper in the wire that rubbed against the asphalt has made me rethink things quite a bit. I haven’t driven the CitiCar since then. Given my other vehicles are working now, I’m considering taking that giant leap and start replacing everything, starting with the motor.

The weather is still good for working outside. I also believe that I have everything that I need now. Wire, switches, monitors, batteries, charger, adapter, motor, controller, contactors, etc. I need to push this project forward.

Other news

My racing switches arrived today along with another tiny radio head unit for Bluetooth and microSD cards. The switches mounting plate looks like it is too high to put it where the stock radio is usually installed.

Switch mounting plate is too tall to put into the area for the radio

Wires

Dragging Wire

Someone warned me that the wires were hanging from the bottom of the CitiCar when I drove up to a car show (that was canceled) on the weekend. They offered a zip-tie, but I thought I had fixed it by pulling up the wires and rearranging the batteries by time they came back with it. Unfortunately, I should have taken them up on their offer. I noticed the wire had been dragging against the pavement. It’s time to get serious on changing over the powertrain.

Wire exposed within 2/0 battery cables from dragging on asphalt

There are a few reasons why this is happening now. The first is that the speedometer cable had been removed, which prevented the wire from going below the motor. However, the latest change was the most impactful. I had installed the motor controller and contact switches. In doing so, I moved the batteries and their wires out of the way so I could get into the area easier. I have the wrong batteries, so there is plenty of room. I think they are moving around while driving, and the motor cables just move along with them.

This is a serious issue. The cables need to be repaired immediately before I drive the car again. It’s questionable on how much of an impact this will have on the amount of amps that the wire can handle now that it’s lost some copper. There is another concern that when driving in parallel, one set of batteries will have less resistance because it has a bigger “pipe” for electrons to flow through.

The new power train is going to be a tight fit, so this will not be a problem afterwards.

Custom Cables

Now that the motor controller and contact switches are installed in the CitiCar, I started moving onto wiring them together. The wires I had were either too short or a bit too long.

I started creating a custom cable. I’m not sure how good my crimp is, so I kept crimping the lug multiple times until the whole length of it seemed to have been crimped. Luckily, I realized that I needed to get some heat shrink before crimping the next lug.

Big tools to crimp big wire terminals
A battery lug that has been crimped one too many times

Teddy and I took the SUV over to the local hardware store tonight. A pack of 5/8″ heat shrink has two tubes that are six inches long. The instructions said to add two inches to the measurement to handle the 4:1 shrinking ratio, so I picked up four packages.

The heat shrink didn’t really shrink that much in terms of length. It seems like I could have gotten away with much less slack. My custom wire looks a bit more professional – to me.

A custom 2/0 battery cable with right-angled terminals and heat-shrink tubing

After the battery cable cooled down, I installed it into the CitiCar to connect the motor negative terminals between the motor controller and the reverse contactor switches.

Custom cable connected to motor controller motor negative (M-) terminal
Custom cable connected to SW202 motor reversing switch motor negative terminal M-
Installing my first cable

Charging Cycle

I got a charge cycle that stopped due to an over-voltage fault. The high voltages at the end of the charging cycles are fairly concerning. After exhausting the CitiCar batteries on a long trip, I kept a fairly close eye on a full charge cycle, recorded the data, and made a few charts:

TimeMin RemainingAmpsAmp-HoursVoltsSoCPhase
9:3479820.9051.020%Phase 1
9:4580320.6451.720%Phase 1
9:5978920.4952.221%Phase 1
10:1377520.21452.723%Phase 1
10:2676220.11853.225%Phase 1
10:3575420.02153.525%Phase 1
10:4574619.82453.826%Phase 1
10:4974019.82654.127%Phase 1
10:5673219.62854.628%Phase 1
11:0272719.43055.029%Phase 1
11:1071919.13255.829%Phase 1
11:1771218.73557.330%Phase 1
11:2435711.93757.473%Phase 2
11:2735510.23757.473%Phase 2
11:312009.03858.289%Phase 3
11:341989.03860.989%Phase 3
11:371949.03964.790%Phase 3
11:411909.03966.190%Phase 3
11:451869.04066.990%Phase 3
11:501829.04167.390%Phase 3
11:541779.04167.690%Phase 3
11:591729.04267.991%Phase 3
12:051679.04368.091%Phase 3
12:091629.04368.091%Phase 3
12:141589.04468.191%Phase 3
12:191529.04568.192%Phase 3
12:24149.04668.192%Phase 3
12:3279.04768.092%Phase 3
12:4000.04855.8100%Not Charging
12:5400.04854.1100%Not Charging
1:0300.04853.9100%Not Charging
1:1000.04853.8100%Not Charging
1:2700.04853.7100%Not Charging
1:3600.04853.6100%Not Charging
2:0400.04853.4100%Not Charging
The state of charge always jumps by 50% in a short period of a few minutes during phase 2
Estimated time remaining is always off by about 400%
Phase 2 appears to be a very abrupt cross-over compared to charging profiles for lead acid batteries around the internet

Over Charging

The charging voltage maxed out at 68.1, each 12 volt battery got up to 17 volts. I hadn’t gone up past 14.5 with regular car chargers in the past. It seems as if the batteries are being overcharged. If they were being equalized/balanced, it would make a bit more sense. This is during the final phase after it reaches 90% charge.

Exaggerated Estimates

The initial estimate was 13 hours and 18 minutes, where the actual charging duration was three hours and six minutes. As the charger progressed through each phase of the cycle, it was getting better, but still highly exaggerated. The device is not learning from its previous charges.

Huge SoC Gains

The state of charge is sometimes abrupt. The state of charge increases gradually until it is at 30% charge at 57.3 volts. Seven minutes later, the battery state of charge jumps to 73% at 57.4 volts. Another seven minutes and we are at 89% charge at 58.2 volts. We then grow gradually up to 92% over an hour, and then jump directly to 100%.

Short Phase 2

Phase 2 is a very short cycle, that is 20 minutes at most. The cross over between dropping amps and increasing reported SoC by 50% is very sharp.

Charger Conclusion

It seems like the Lester Summit Series II charger may be defective or had the wrong battery profile. The CitiCar has four 12v Interstate 31-ECL in series. The battery profile (22001) description seems fine other than the amp hour rating. When I called up the manufacturer, the amp hours (190 RC@25 amps) wasn’t a problem and I was told that the default profile was fine.

  • Single-voltage mode: 48V flooded/wet lead-acid battery packs with a 20-hr rating of 225-260 Ah
  • Auto-voltage mode: 48V, 36V, or 24V flooded/wet lead-acid battery packs with a 20-hr rating of 225-260 Ah
  • Profile parameters: 22A bulk (48V), 25A bulk (36V), 25A bulk (24V), 2.39 VPC absorption, 9A finish, Progressive DV/DT termination, equalize active

I wish the charging status was more descriptive rather than saying “Phase 1”, “Phase 2”, and “Phase 3”. The phases do not convey any information. It would be more useful to see something like Desulfation, Bulk, Absorption, Float, and Equalize.

Capacity Monitor

The capacity monitor arrived. This was one of the last major components of the new system that I had been waiting for. It was fairly simple to setup and I started getting feedback immediately on the amount of amps the CitiCar motor uses when initially starting or going up hills and cruising.

It seems to go around 250 at most, but occasionally has small spikes at 350. Cruising appears to be around 125 amps. I’ll need to put a camera on it while driving to look back later to get a more accurate reading of data.

One special thing of note is that I’m now aware of how much phantom power is being drained. The battery charger and capacity monitor both consume a small amount of amps.

The capacity is not useful for driving at this point because the detected voltage keep swapping between 24 and 48 volts. Once I upgrade the CitiCar to always use 48 volts, the capacity should become useful. However, it does appear to be fairly accurate reporting the same number of amp hours that the battery charger reported.

The capacity monitor is more precise on the number of amp hours supplied by the charger
AiLi Voltmeter in CitiCar

Speedometer Cable

Now that I’m using a GPS speedometer, the existing speedometer cable is no longer needed. The cable was entering the floor next to where the new throttle was installed, and I was fairly concerned that it could get caught up on the arm. It also clears up the mess of wires behind the dashboard a bit.

Speedometer cable entering car through floor next to throttle pot box

There was a bunch of black rubbery caulk where it entered through the floor. Once the caulk was removed, I saw that the throttle I installed covered part of the opening. It was difficult with the room remaining – but after working with it, I was able to pull the end with the bolt out.

The next part was pulling the cable off of the underside of the car. It was threaded above the brake lines and emergency break. Once I got most of it pulled through and hanging out of the front of the car, the next step was to remove the other end.

I was able to unbolt the speedometer cable by reaching down into the battery compartment. It was a tight area trying to get a good grip with some pliers, but it was easier than pulling the bolt through the floor.

Speedometer cable zip tied to underside of CitiCar frame

I thought I was home free as the wire started sliding freely under the carriage until I hit a snag. It was in a tight spot that I couldn’t see. I got out my phone and looked around. A zip-tie was holding it against the frame. After confirming that no other wires were being held in place, I jacked up the car enough that I could reach up with some tin-snips and cut the zip tie.

The cable is fairly sturdy and doesn’t like bending much. It was holding its shape pretty well after being removed from the car. Each end has a metal shaft that spins to indicate how fast the motor is spinning. It may seem like a simple task, but its another step forward. Progress.

In other news

I took my SUV into a car dealership. I’ve had two people “fix” it already, and it feels like I’m losing money on temporary fixes. The professionals took a look at it. Although only a fastener on the transmission was broken, I was told that the shifter cable needed to be replaced as well since it’s more of a combination of the cable and fastener.

The parts will be in tomorrow morning. I had the option to bring it home, but I was told that the vehicle broke again as they parked it. I felt lucky that I was able to get it to the dealership, and wasn’t about to tempt fate again driving it home and back. The walk home was about three miles. I sense another long walk in my immediate future.

The walk home had me thinking of what options I may have to haul the CiitCar on a small trailer, that the CitiCar could haul on its own. It would have to be very lightweight and support the CitiCars weight. It would give me the option of hauling it to a destination where the towing vehicle can be dropped off. Both of my primary vehicles have a hitch. I would need to determine where I could install a hitch on the CitiCar.

Another thing to look into is if the trailer could serve as some kind of car jack that would make it easier for me to get underneath of the car to make upgrades and repairs. Of course, I would have to stabilize the trailer – but it would seam to be a safer way to jack it up, and to a higher level.

Two aught

I reached out for help regarding battery cables with other d-car owners and enthusiasts. Along with the advice that I got, one of the locals that I met in the CitiCars maiden voyage was willing to help out with supplies and tools leftover from his EV conversion project. Teddy and I hopped into our little car and zipped downtown to the town square.

We met up and with more understanding of the parts of an EV, I was able to have a more knowledgeable conversation this time and had a lot of questions to ask regarding his setup. learning a bit more about how the guy upgraded his pickup truck. I paid more attention to his setup and had my eye on his use of project boxes to keep things segregated, organized and protected. He had quite a bit of advice when I asked about wiring harnesses and thoughts regarding a themed car that could be easily reverted without damaging the body. His thoughts were to look into Plasti Dip and a brand for “Painless wiring” for quality cables/connections where cables are labeled and easy to install.

He had a large box of thick battery cables and two bags of battery lugs. The box was heavier than I had thought and caught me off guard for a moment. Along with the box of cables, I was able to borrow some wire cutters and a gigantic crimping tool. I opened the CitiCars back window and we stuck everything in with plenty of room to spare. Unfortunately, I forgot to grab the wire cutters…

Teddy grows some wings

Teddy and I enjoyed the park and took a stroll down main street. We went through Inklings, posed in front of a mural, and grabbed some ice cream from C & C Frozen Treats. Teddy had some mango while I ordered a quart of brownie ice cream.

Teddy, Lewie, and The Chez CitiCar

By time we left, it looked like a bunch of antique cars were arriving into the town square for a little car show. I had to bail before the rain came. I didn’t make it home in time, and the rain was coming down pretty hard. I kept the wiper on the lowest setting and didn’t run into any problems blowing a fuse this time.

Running 120 volt AC via J1772

The replacement Level 1 & 2 electric vehicle supply equipment (EVSE) arrived today. I verified that it was operational and setup the CitiCar to charge it’s batteries through a J1772 port. I don’t know if the folks at Sebring-Vanguard had ever imagined such a thing, but I am now able to recharge the car at a public charger. Here is the setup in order from the wall to my cars batteries in my little experiment:

  • 120 volt (5-15) outlet in wall
  • Level 1 & 2 EVSE (5-15 & 6-20)
  • EV Charger Power Converter (from J1772 to 120v & 240v)
  • Power strip
  • Five 12 volt battery chargers
  • Four deep cycle batteries for the motor and one small accessory battery
Displaying how I’m charging lead acid batteries with power supplied via J1772

I was loosing a tenth of an amp with the EVSE and power converter. To add more fun to the experiment, I decided to let the car charge to full capacity through the J1772 setup and see how much the total energy is affected.

Cable Inventory

Battery cables

Later in the night I started going through the battery cables I received to get an idea of what I had. The cables can be called either 00, double zero, 2/0 and pronounced as “two aught”.

I started taking inventory, measuring inches from the center hole of each lug.

LengthQuantityLengthQuantity
11
6710¾1
413¼1
213½1
7113¾4
1142
114¼4
114¾1
Cables with flat lugs at each end

Some cables also had a 90 degree lug at one end, but the shorter ones didn’t have a lug at all on the opposite end.

Missing LugTwo Lugs
5
4
312
12¾
13½
Cables where one end has a 90 degree lug

Two long cables were included that were 13 feet, eight inches, and another at fourteen feet, 11 inches. The longer cable didn’t have a lug on one of the ends.

There are quite a few good cables that I can use. The longer cables alone may be enough on their own. Many of the smaller pieces can be used for jumps between switches, fuses, controllers, and such.

Battery cable connected to two Chevy Volt battery modules

I found that I could barely use the 10¾” cable to connect two Chevy Volt battery modules next to each other. I have four cables that are 13¾, and four more at 14¼ that I could use with more slack between the batteries. It’s preferable to have a shorter length to reduce voltage drops. Although with the length of this circuit, the drop would already be fairly minimal.

Corroded lug
Wire brushed lug

I spent some time cleaning up one of the most corrosive lugs. I first tried to do it by hand with a wire brush with some progress. I then grabbed my angle grinder with a wire brush attachment and cleaned it up fast. I was finding that I was chasing some of the corrosion down under the heat shrink around the lug.

Things are coming along great. I have many cables that I can clean up and use once the motor arrives. I have the supplies necessary to make my own custom length of cables as well.

Tiny Radio

One of my tiny car radio modules came in the mail today. I actually ordered three different kinds because it was difficult to judge how big they were. This three dollar radio was originally just for a side project to stick on a repurposed 8-track tape. The idea was to give my 8-Track radio some modern features to play music from a blue tooth device as well as micro SD cards.

Bluetooth MP3/WMA decoder USB/Micro SD/Aux FM radio module

I was originally set on installing an 8-Track radio and an Android media entertainment center for navigation in the CitiCar. I’m having a difficult time determining where I should put them. I don’t have much space available on the dashboard to mount things, or the support to mount anything with some weight. I’m considering using one of the little radio modules instead.

I was able to wire the little radio up to work with both five and 12 volts, as advertised. The radio works, Bluetooth hooked up without a problem, and I was able to get MP3 files playing from a micro SD card. One thing of note is that I definitely need an amp. The little radio can put out a signal, but any speaker I try is so low, it is difficult to hear. The voltage supplied to the radio does not make a difference.

WAYPOINTODOMETERDISTANCE
Home1,134.1
Town Square1,138.03.9
Home1,141.93.9
Total7.8
RECHARGEENERGYCOSTDURATION
RatekWh9.85¢0.46 mph
Total2.21 kWh22.4¢17:00
Per Mile283 Wh2.9¢02:10