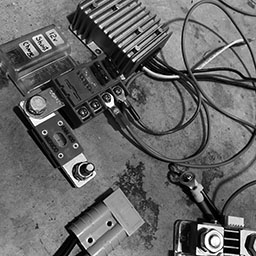
A small fuse block arrived that can mount directly to a terminal, but offers only four fuses. I picked this up for the 48 volt system since there are not many things that the larger system voltage is needed for.
A small terminal block hooked up to a few devices.
At the moment, I have a fuse for the DC-to-DC converter, Battery Capacity Monitor, and the battery Charger. The last spot will be for the combination of the key switch, main contactor solenoid, and reverse input. There are also relays for forward/reverse that allow 12 volts to activate the coils on the SW202 switch. I may eventually setup a second DC-to-DC converter that sits behind the dashboard.
In Other News
I’ve been reaching out to a few local business owners, looking into setting up a makerspace in my town.
I’ve been receiving more products in the mail lately and figured I had better start experimenting with them before I get overwhelmed with too many things. Tonight I decided to learn how to wire up a switch to my DC-to-DC converters and light up the LED within it using the 12 volt output.
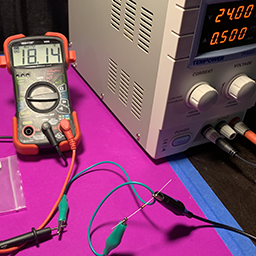
Bench Power Supply
I had quite a few adventures trying to get it setup with the buckey converter first using a bench power supply. I had experimented previously setting up the buck converter in my car after replacing some fused, but without a switch. I took it one step at a time.
Light up the LED with 12 volts from the bench power.
Light up the LED with the buck converter.
Turn the voltage regulator on and off with the button.
30 Amp Step down converter
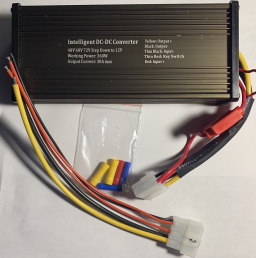
I made a few mistakes, but I was able to get it working in the end. The buck transformer is only setup to deliver 5 amps over 12 volts, for a total of 60 watts. The next test was to try out a DC-to-DC step down converter capable of 30 amps over 12 volts as 360 watts. This converter was a bit special since it had a wire for a key switch.
It has a minimum of 48 volts that it will work with. My bench supply only delivers a maximum of 32 volts. The rest of my adventures were out in the garage wiring it up to my cars batteries.
I had a very difficult time with the instructions. There were two main issues that held me up. The one that held me up the most was the diagram of the key switch leading to the 12 volt output supply with yellow and black wires. The written instructions were a bit off as well regarding wire thicknesses. The actual wire harness did not match the photo on the instructions regarding red wire sizes relative to each other.
I made a few corrections and posted them here as a reference for anyone else who may be considering this device, or have already purchased it and are just going nuts trying to figure it out.
Pro Chaser DC-DC Step Down Power Converter Corrected diagram with notes
For your viewing pleasure, watch me as I tried to figure this out.
Join me on my little lab experiments. I’m setting up a system to support stepping power down from 48 volts to 12 volts with a switch that lights up. Initially using a buck converter, progressing to a converter with a key switch. These are usually used for boats, golf carts, small solar batter banks, etc. I’m using this for my tiny electric CitiCar.
A few packages arrived over the weekend for modernizing the CitiCar. The majority of items that arrived support the 12 volt accessory power supply using the batteries that drive the motor, instead of a separate battery.
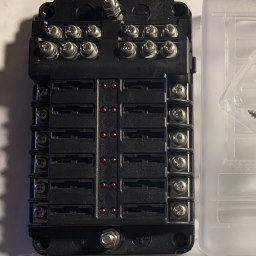
Fuse Block
The majority of fuse blocks look the same to me. It all comes down to choosing between having a standard number of six fuses or twelve. The car has seven fuses, so I went with the larger size.
Some of the features I like are that the LED’s will turn on to indicate that a fuse has blown. Another thing I like is that the negative terminals are all at the top. It came with a variety of 24 blade fuses, stickers, and a cover.
12-Way Fuse Block With ground, 12 Circuit ATC/ATO Fuse Box Holder with negative bus, Protection Cover & LED Light Indication, Bolt Terminals, 70 pcs Stick Label, For Auto Marine, Boat,With 24 pcs Fuse
Voltage Reducer
I previously purchased a Buck Transformer that could supply up to 5 amps at 12 volts. It worked, but the amps were lacking in what I needed.
I found a DC-to-DC power converter that could step voltage down anywhere from 48 to 120 volts, and bring it down to 12 volts. The output current is rated at 30 amps.
Besides the amps, I like the ability to disconnect the power easily with the connectors that the provided, and the added feature of having a key switch turning it on so that it doesn’t drain the battery while the car is not being used.
Pro Chaser DC-DC 120V 108V 96V 84V 72V 60V 48V Volt Voltage to 12V Step Down Voltage Reducer Regulator 180W 15A for Scooters & Bicycles Golf cart (30A 360W)
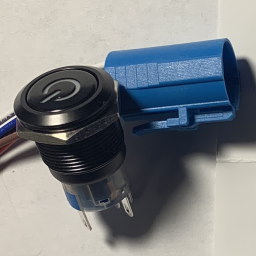
Power Switch
I wasn’t too happy when I saw sparks in my previous experiment with converting a high voltage to 12v using the buck converter. In turn, I found this power switch that I can press to toggle it on and off.
I’m going to see if I can run two different voltages through it if the LED terminals are separate from the switch terminals. I’ll wire up the LED directly to the Buck 12v output, and let the switch terminals control the 48v feeding it.
I picked out this switch because it came with a wired harness that could be disconnected easily, and the LED lights up. From what I saw, the LED and the switch could be wired up in multiple ways.
Quentacy 19mm 3/4″ Metal Latching Pushbutton Switch 12V Power Symbol LED 1NO1NC SPDT ON/OFF Black Waterproof Toggle Switch with Wire Socket Plug (Blue)
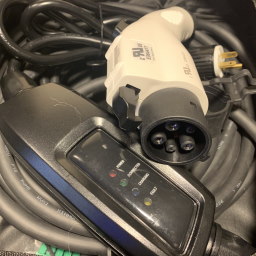
Portable EVSE
I’m setting up the vehicle so that it can recharge and public charging stations that support J1772. This EVSE (Electric Vehicle Service Equipment) takes power from a 120 and 240 volt wall outlet and provides a Level 1/2 power supply to my vehicles onboard charger.
At 240v and 16 amps, I could charge up to 3.84 kW. Using just 120v over 16 amps would be 1.92 kW. My current battery setup takes 12 hours to supply 3 kW. However – they are lead acid. With the new Chevy Volt batteries, I’ll be able to charge much faster, and have a demand for more watts to be supplied.
Being portable, I can put this in the back of the car and charge up at a friends house or a friendly business willing to let me have a few kilowatts.
I got this specific kit because it came with a case, supported 120 & 240 volts, had an adapter to work with both NEMA 5-15 and 6-20, hook to hold the cables, and a holster to hold the end of the plug when not in use.
Megear Level 1-2 EV Charger(100-240V,16A) Portable EVSE Home Electric Vehicle Charging Station Compatible with Chevy Volt, Nissan Leaf, Fiat, Ford Fusion (NEMA6-20 with Adapter for NEMA5-15)
Dash Cam
This one is a bit of an experiment. I’ve been interested in dash cams for a few years with all of the odd things I see on the road, but never jumped into actually getting one.
This camera was fairly cheap and I figured I’d try it out as a learning exercise. I don’t expect much from it, but for using it with the CitiCar, I think it might be perfect. If anything, I’ll have a few videos to post on YouTube.
Besides the cheap price, it seems to have gotten good reviews on YouTube and the quality appears to be reasonable.
AUKEY Mini Dash Cam 1080p Full HD Dash Camera with 1.5” LCD Screen Car Camera with 170° Wide-Angle Lens, G-Sensor, WDR, Motion Detection, and Clear Night Recording
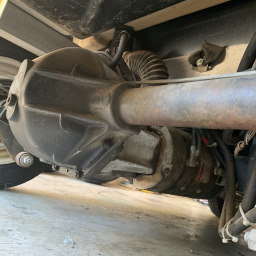
I’ve been talking with a few people in CitiCar and Comuta-Car groups and to someone at D&D Motor Systems to replace the motor that I’ve got. The model numbers of the motor and axle that I have do not provide enough information alone.
Dana spider axle and motor on a CitiCarv
For anyone going down the same route, here are the numbers that I see, that you can use for reference. The motor has some details on its plate, but some of the details are worn. I am unable to see the serial number at the moment:
GE 6HP Series Wound 48v DC motor plate
Manufacturer
General Electric
Voltage
48V
Wound
Series
Horse Power
6
RPM
4000
Amps
125
Class
F
Time Rating
INT
Model
5BC 49 JB 327 C
Motor plate information
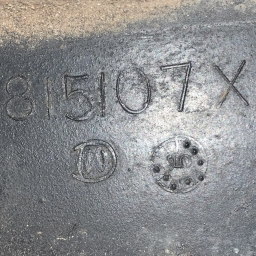
Numbers 815107X and 5 on a Dana Axle
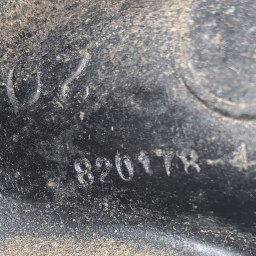
Numbers 20 and 820178-4 on Dana Axle
Numbers 820178-4, 5, and 20 appear on the axle. Another number appears as 815107X, but it may also be 8/5/07X or 8/5107X or 8/5107X.
The number five appears in the center of a circle, tilted on its side, with eight dots around it in odd positions filling eight of ten spaces.
There is also a letter “D” with a letter “W” inside of it.
I need to pull the motor off of the Dana spider axle to see inside and identify the motor coupler, spline, or shaft it will need. I’m not at all a car guy, but that’s the lingo I keep hearing. I’ll just pull it off, snap a few pictures, count things, and make some measurements with my calipers. How hard can it be? After all, I’ve watched David Brunson install a motor on his Comuta Car, so I’m certain that I am an expert mechanic now.
I wasn’t sure if removing the motor involved axle oil spilling out. I was told no, but then a few people chimed in and started offering tips on how to replace the axle geese. I figured while I’m working in that area on a 40 year old car, what bad could come from fixing something that ain’t broke? It felt like general maintenance that should be done every X-thousand miles or X-years, whichever came first. Sure enough, the owners manual had something to say about it:
The 1976½ CitiCar Owners Manual
SIX MONTHS AFTER PURCHASE AND EVERY SIX MONTHS THEREAFTER
Check differential fluid level. Use 90 weight Hypoid gear oil. Fill to top. In cold weather lighter weight fluid may be used. It is not advisable to mix different weights. When changing types of oil, flush system. Use no lighter than 30 weight oil.
I’m under the impression that the “every six months” is just topping off what’s already there, but this thing is so old, I’m wondering what I’ll find inside. I think I can just drain the fluid and fill it back in. If I need to crack it open, I’ll have everything on hand, just in case.
I previously had no clue what a differential was, but apparently it is something inside the rear axle. I watched a video by CitiCar Tom rebuilding his Terrell differential for a different axle than mine. I watched another about replacing differential fluid and ordered everything I didn’t already have, and got a nice 20% discount.
Supplies
Part #
Price
Discount
Mobil 1 Synthetic Gear Lubricant LS 75W-90, 1 Quart
26101
$13.99
$2.80
Permatex Ultra Black Maximum Oil Resistance RTV Silicone Gasket Maker (3.35 oz)
82180/82150
$8.49
$1.70
Performance Tool Multi Use Pump
W1145
$16.99
$3.40
CRC Brakleen® Break Parts Cleaner Non-Chlorinated (14 wt. oz.)
5088
$3.59
$0.72
FloTool Standard Duty 7 Quart Drain Pan
OP-112EMI
$3.49
$0.70
TEQ Correct 2 Ton Hydraulic Trolley Jack
TQ924
$41.99
$8.39
$88.54
$17.71
Order from Advance Auto Parts
DC to DC
Buck converter and 12v socket
The other night, I had a few supplies come in. One was a DC-DC Buck converter from 24/36/48v to 12v. I was hoping I could hook it up so that it would work in both the 48 and 24v mode that the car runs in.
I had two sets of wired 12v sockets. I cut one of them in half and spliced the buck converter into the middle. I ran down to the car, hooked everything up and saw/heard an unexpected spark as the wire made contact. Nothing blew up.
I also got one of the cheapest 12v car devices I could find that was still a little useful, but I wouldn’t mind having it blow up if something I did would destroy it. I found a volt meter with 2 usb ports. I plugged it in and it showed 12.7 volts. Everything worked in both the 24 and 48 volt configuration.
Given that I saw the spark, I knew this would always be on, even when nothing was plugged into it. I went ahead and placed an order for a fancy latching switch button that lights up when the power is on. It comes with a pre-wired socket, and I believe I can setup the LED to run off of the 12v supply while the 48v power only flows through the switch itself.
In the mean time, I installed the other socket onto my accessory battery.
Dual USB Car Charger 4.8A Output Cigarette Lighter Voltage Meter
$9.99
19mm 3/4″ Metal Latching Pushbutton Switch 12V Power Symbol LED
$9.99
GPS Speedometer
The T600 has connected to Skynet
I purchased a little T600 Universal GPS Smart HUD. This thing is more of a curiosity to play around with, but I got it because I needed a battery monitor, and I like some of the features it came with.
This thing feels and looks cheap. It simply gives you the bare bones of features it advertises. The most fancy display has a round swoosh below your current speed.
I had to configure it first to bring the speed adjustments down to 100% and offset to 0 mph. I also played around with the three colors that it shows text in.
Speed
Speed Alarm
Distance
Voltage
Voltage Alarm
Duration
Cardinal Direction
Altitude
Clock
The features I like of the T600 Universal GPS Smart HUD
Leaving Home
CitiCar at Advance Auto Parts
Teddy and I started our trip to pickup some supplies to change the cars axle oil, and to pull the motor off to take a closer look at the spline for the shaft of a new motor. As we pulled into the parking lot, there was a police car strait in front of us. Sometimes I think they are going to make up an excuse to pull me over just so they can have a closer look.
Teddy waits to take off on another ride
We wern’t at the store for too long, as it was an online order for pickup. It started to rain a little when we took off. I took Teddy over to Gertrude Miller community park on the way home. It got really dark, windy, and rainy very quick. I started wondering if the wind was strong enough to blow the car over.
Our first trip in the rain
The trip home was… interesting. The roads were wet. The rain was pretty hard. I had the wiper running along with the lights. I saw my voltage on the accessory battery was down to 12.0v. I even tried the defroster to see if I could defog the window. When I turned on the fan, I didn’t feel any air coming through the window vents. The simple fix was to use my hand to wipe down the window. I’ll have to look into what I can do to defog the windows later.
Dead after arrival
As we pulled into the garage, I turned off the lights. Since I was playing with the GPS HUD, I flipped the switch for the lights back on and see how much they impact the accessory battery.
Nothing.
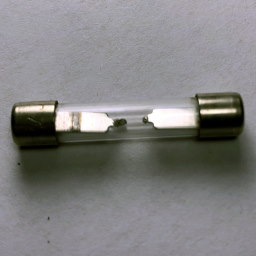
I suspected that a fuse had blown. I grabbed my multi-meter and tested all seven for continuity. I found the bad apple. When I matched the position up to the cover plate, it was labeled as a fuse for the break, turn signal, and horn. I turned on my turn signal and it worked. I pulled out the fuse… still works. I’ll need to re-label these fuses later. Even if I was reading the panel upside down, the other label indicated it would have been the controller.
Luckily for me, one of my first investments in the car was to purchase a variety of fuses and throw them in the back of my car. The cover plate indicated a 20 amp fuse would be adequate for the lights. I replaced the fuse, and all was well with the world.
I took a look at the burnt out fuse and noticed it was rated for 30 amps! My speculation is that the previous owner put that in there because they got tired of replacing 20 amp fuses. Since this happened at the tail end of the trip, I’m guessing that the wiper motor had too much trouble as I entered the garage. Since it wiped away all of the rain, there was a great deal of friction to continue.
In the meantime, I have a DC fuse block on order with sticky labels and LED’s that light up when a fuse is blown. I’ll add the lights and windshield motor to my list of things to upgrade later.
Accuracy
Regarding the GPS HUD, there were a few things enlightening about it. The speedometer on the car was reporting 4 miles faster than what I was actually traveling at. I was able to set my phone next to the GPS monitor and confirm its accuracy. I thought I was going amazingly fast the other day pushing the car to 33.5 mph, only to realize now that I was going under 30.
On a related note is that the distance I have driven on the odometer is much higher than this new gadget is reporting. There seems to be a large discrepancy in just a few short miles. When I punch my routes into Google Maps, It’s sitting in the middle of the other two.
Waypoint
Odometer
Distance
T600
Google
Home
1,088.9
Advanced Auto Parts
1,093.0
4.1
3.5
3.7
Gertrude Miller Park
1,094.2
1.2
1.0
1.1
Home
1,097.4
3.2
2.8
3.0
Total
8.5
6.3
7.8
With the battery voltage meter, I felt better to see how the lights and a wiper affected the voltage with a general idea of the batteries health. I would still prefer to see a capacity meter of some kind with a percent, colors of red/yellow/green, and a bar showing how much is left.
I used the altitude feature to get an idea about how high the hill is to get out of my little neighborhood. The top of the hill is at 648 feet above sea level, and the lowest point is at 508 feet. Every time I go on a little trip, I’m starting out with a 140 foot tall hill.
I know it’s super cheap, but here are some other things I wish it had
A separate set of leads to connect to your battery – monitor 48v battery voltage while connected to a dc-to-dc 12v converter
A switch to turn it on
Buttons on the front
Better sticky pad. It keeps pulling up from the dash