Category Archives: Motor

The Little Car That Couldn’t

I’ve got a real sense of pride and accomplishment now that the CitiCar is able to drive out on the open road again. I’ve taken it on a few test drives, and I’ve ran into a few issues.

The biggest risk of failure is when there is a change – no matter how small. Hold my beer… I just replaced the entire powertrain with equipment that I was unfamiliar with.

The most notable issue is that the car felt like it lost power quite often. It was a bit annoying having to coast to a safe spot to pull over and diagnose what was happening.

The beginning

Teddy and I went on a test drive into town. We had a great time visiting C&C Frozen Treats, I want Candy, and eating ice cream at the town square. We headed over to McDonalds for a bite to eat and then headed towards home.

It first started where I pressed the throttle and the motor would jolt and turn off. After doing this a few times, I slowly pressed the throttle and was able to continue to drive. I suspected that the motor controller was implementing a fail safe to make sure the throttle high-pedal was off before the resistance changed on the potentiometer, and that there was some kind of race condition. As the CitiCar continued to have trouble a little later, I would keep trying to ease my foot lightly onto the throttle.

No Power

Finally, the motor wouldn’t turn on at all and I ended up coasting into the Knotty Pine restaurants parking lot. I was at a loss. I couldn’t figure out what was going on. I had power for everything else. I could hear the contactors activating when shifting between forward and reverse. I pressed the throttle lightly and heard the main contactor activate. “It’s back!” I thought. My next hypothesis was that maybe there was some kind of additional fail safe where the controller would lock me out of operating it for a couple minutes to protect itself.

Paranoia

Continuing on, I was praying I could get home without calling a tow truck. I was going up hill. I decided to play it safe and take a side street, still going up hill and… I lost power again. Here I was, slowing down going up a hill, and someone was behind me. I was almost at a dead stop when the car drove around me. I was a bit paranoid when I recognized the markings of a police car.

I couldn’t go up hill, so I coasted backwards into a driveway and put on the emergency brake. I was trying to figure out the problem in case the officer came back around to check in on how I was doing. I was there for roughly five minutes, certain that I was stranded. It came back alive and I was off, praying I could get back home.

EV at the Gas Station

I didn’t make it far. As soon as I turned onto the main road, I lost power. I coasted into the new gas station parking lot and just barely got into a nice parking spot. I figured if I was going to be there for awhile, I could grab a bite to eat. The person in the vehicle next to me asked if he could take a photo of the car. We talked a bit and I showed him around the car.

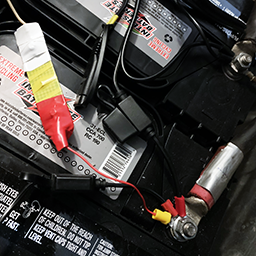
I broke out some alligator clips and a multi-meter and started testing connections. I traced the problem down to a loose connection on the throttle high-pedal contact switch. The wire had almost come off. I pushed it back and it was good to go.

I started to approach the exit and realized the speedometer didn’t have any power. I looked over at the fuse block and saw a light was on. I must have blown the fuse when testing connections with the alligator clips. I pulled off, replaced the fuse, and left the gas station.

Final Stretch

I lost power once more on the way home without much of an area to pull off. I pulled as close to the curb as I could, fixed the issue, and continued on my way.

As I pulled into my subdivision, I was relieved to know that the last half mile was just coasting home. That was the roughest trips I’d ever been on in the CitiCar. Taking a closer look, I noticed the switch’s spade was bent a little, and there was no slack on the wire connected to it. I created an extension wire to add some slack. I noticed the connection felt loose, but I thought nothing of it… until I started running into problems with the next drive.

The Actual Problem

The problem was that the contact switch on the potbox is not as wide as my spade terminals. The female spade terminal was loose and kept falling off.

Snug connectors on throttles high-pedal switch
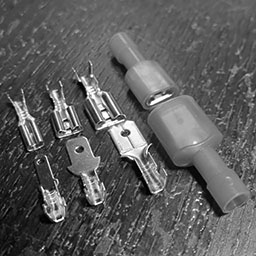
Pairs of 2.8, 4.8, and 6.3mm spade connectors next to an insulated 6.3 spade connector

I ordered an assortment of spade terminals in various sizes. The 4.8mm female connector fit snug onto the switch. I made a few mistakes trying to crimp a non-insulated terminal. I watched a couple of videos and was able to figure it out.

Stalling ICE

I was thinking what would happen if an ICE car did this – and then I realized it does. The first car I owned was a Dodge Colt. My dad matched half of the price. It was a good car, but it was stalling all the time – at stoplights, and even traveling downhill at 90 mph. I was often having trouble trying to start it back up. I knew nothing about cars, but my dad did. I recall he seemed to be close to figuring out the problem. It really stumped him. Eventually the car ended up in a junk yard. I feel as if the CitiCar is much simpler to troubleshoot. Rather than moving parts, vibration, noises, and fumes – it’s just bare-bones simple electronics.

Alltrax Troubleshooting (and story about contactor)

In other news

I’ve changed both diodes on the forwards and reverse shifter from 1 amp (1N4006) to handle 3 amps (1N5408). In addition, it’s legs are thicker and less susceptible to breaking, causing the same experience with no power to the high-pedal – however one direction would still work until the second diode broke.

The new D&D Motor Systems motor is about five miles slower than the stock motor from the manufacturer.

I’m looking into other options to track speed without GPS.

I’m looking into installing small lights to work on the car easier and show it off.

I might setup the solar charging station / EVSE this weekend. It can also serve as a backup power supply for power outages.

I’ve been learning about field weakening as a potential option to increase the speed of the motor. From what I gather – 2/3 of original nichrome resistor between S1 & S2 terminals on the body of the motor, use a solenoid to turn it on.

Powertrain Upgrade

Quite a bit has happened since the last post where the majority of my nights and weekends were focused on the CitiCar, and a bit exhausted by time I’m done for the day. The videos were still being posted, but I just didn’t have the mental willpower to write up a detailed account of what was done. here is a brief summary of the last two weeks.

Battery cables

2015 Chevy Volt lithium batteries and charger installed into car and connected in parallel with cables from an old EV and a few battery cables that I made myself from materials provided by a local CitiCar enthusiast.

Battery terminal side-brackets installed.

CitiCar battery cables

Main Fuse & Switch

Installed an ANL fuse box to hold the 400 amp ANN fuse. “Sculpted” the cover to make it fit over the thick 2/0 cables and lugs connected to it.

Installed a heavy duty switch to disconnect the power that could handle the large number of amps that the motor will draw from the batteries. Purchased some screws at the hardware store to mount the switch.

Continuing to add cables along the path from the positive battery terminal to a switch, fuse, contactor, etc. Cleaning battery acid from cable lugs donated from another EV.

Main Fuse & Switch

Fuse box mount

Created a backplate to mount a new 12 volt fuse block out of diamond plate aluminum, and mounted it into the car where the accessory battery had previously sat.

Wired up chargers charging wires. Zip-tied the extension cable going to the J1772 adapter along the cars frame. Ran 10 gauge wire to the front of the car, specifically to run the 12 volt DC-to-DC converter and to control the motor controller and contactors from the dashboard.

CitiCar Fuse Box Mount

Installing DC2DC

Wrapped power supply cable to the front of the car with split tubing to protect it.

Installed a 20 amp 12 volt power supply in the CitiCar to convert the batteries 48v power supply to 12v. At most, it can handle 240 watts.

Added a LED light strip with a switch.

Installing DC2DC

Powered Dashboard

Connect the dashboard to the 12v fuse block. Wire up the frame to the 12v negative. The cabin light is unable to get power. The original contactors are still activating.

Powered Dashboard

Wires and Switches

Painting battery cables red. Starting to prepare other cables to paint.

Comparing two separate motor reversing SW202 style switches. Changing from 12v coils to 48v coils to simplify wiring and reduce the need for relays.

Change the old 120v charger cable into an extension cord by adding a NEMA 5-20R receptacle socket. Added a second charging cable plug to the car so that the batteries can be charged via J1772 in the back, or 120v on the side by changing which cord is plugged into the back of the charger.

Wires and Switches

Painting Battery Cables

Painting battery cables with Plasti Dip to indicate how they are connected to the batteries. Added heat shrink where it was missing. Cut off rubber terminal covers. Wrapped up terminal ends with painters tape.

  • Red – Positive, and motor A1
  • Black – Negative, and motor A2
  • White – Motor Negative
  • Blue – Motor S1
  • Green – Motor S2

Painting battery covers.

Paintiing Battery Cables

Plasti Dip Battery Modules

Continuing painting battery cables and the battery covers on the 2015 Chevy Volt battery modules. Problems with using painting tape to paint two colors of Plasti Dip, as well as an unexpected early morning rain getting things wet. Cleaning up and painting battery modules blue for a more appealing look. Finish painting the battery cables.

Plastic Dip Battery Modules

Finish Battery & Cables Paint

Finish painting the battery volt modules and peel off the painters tape. Clean and neutralize battery acid on battery cable lugs.

Clean and neutralize acid on passenger side battery box floor. Start laying down thermal layer and toolbox liner.

Improve technique to peel painters tape from wet Plasti Dip to have nice hard edges.

Added some corrasion/oxidizing protector to battery cable lugs and battery box floor.

Finish Battery & Cables Paint

Battery Box Liner

Line the battery compartment of the CitiCar with toolbox liner. The liner is preferred because it is non-conductive. The frame of the car is conductive and wired to the battery negative, so this helps prevent a short in case a battery positive wire accidentally touches the frame. The thermal barrier may help with battery temperatures and a little extra padding for bumpy rides.

Drivers side was neutralized. Corrosion protector was removed, as it left an oily residue and wouldn’t be suitable for applying adhesives to keep the toolbox liner attached.

Battery Box Liner

High Voltage Stickers

Created some battery labels to warn about high voltage, and to provide details about the batteries.

Creating High Voltage Stickers

Drivers Side Batteries Installed

Re-installing the drivers side painted batteries, main switch, and fuse after lining the battery box with toolbox liner.

Drivers Side Batteries Installed

Battery Terminal Caps

Cut motor mounting brackets down further with new diamond cutting wheels. More battery cables were installed. Created caps to protect exposed terminals from moldable plastic that melts in warm water. Installed shunt in a different position for easier access to plug in wires.

Battery Terminal Caps

Powertrain Test

Wired up the motor and motor reversing switch. Setup switch and diodes on the front of the car to activate the contactors and let the motor controller know if the vehicle is moving in reverse.

Powertrain Test

CitiCar Runs Again

Troubleshoot contactor activation. Reverse direction of Forward/Reverse diodes. Got the wheels to spin (and in the correct direction). Go on a test drive.

CitiCar Runs Again

Alltrax Troubleshooting

Configure motor controller to accelerate faster, adjust voltage limits, and provide more amps to the motor. Since the motor was just replaced, I topped off the differential fluid. The speedometer wasn’t turning on, so I replaced it with a spare that I had laying around. Drove into town and ran into problems on the way back home with a burnt fuse and a disconnected high-pedal switch on the throttle.

Alltrax Troubleshooting

Motor Wires

Most of yesterday and the entire day today was full of rain. I wasn’t able to get much done compared to Saturday. Most of the day has been spent planning, researching, and cleaning the garage.

Alltrax Wiring

I’m working in a tight space with the motor controller, contactor, and motor. It’s difficult to bend thick cables, and harder to work with thick terminals overlapping each other.

I was in a tough spot with trying to get two wires connecting to the motor controller, and I was wondering if it was important that the wire from the motor goes to the controller, rather than directly to the contactor. Electrically, it didn’t seem to make much of a difference.

Alternative wiring proposal

C-Car and one DIY EV conversion owner said their controllers were wired up in this way. I sent an email out out the manufacturer.

Wiring Question

Hello.

I have an SR-72500 Motor Controller.

I am installing this in a CitiCar, which was previously controlled by applying 3 different voltages to the motor.

I’m looking at the Generic Series /w SW202 Reverse wire schematic in the operators manual SR (page 22)

On all diagrams in the manual, I see:
1 wire going from the SW180 contactor to the motor controller B+ terminal
1 wire going from the motor controller B+ terminal to the series motor A1 terminal

I’m working in a tight space and it’s difficult to get two lugs onto the B+ terminal.

Can I have the wire to the motor come directly from the SW180 contactor? These are the changes I am proposing:

keep 1 wire going from the SW180 contactor to the motor controller B+ terminal (no change)
add 1 wire going from the SW180 contactor to the series motor A1 terminal
remove 1 wire going from the motor controller B+ terminal to the series motor A1 terminal

The Answer

Technically speaking it will work, electrically speaking you’re going to cause an issue doing that. If this was a low current system, like a stereo then this would be fine, but since we’re low voltage high current we have to know where current is at all times. So when you put the two wire connection on the solenoid it turns the motor and controller into two separate loads the moment the solenoid closes and both are fighting to get the current coming out. Motor is bigger, it gets the current, and the controller just watches things happen without doing its job.

If you wire it that way, it will operate though, it may just do some weird things randomly.

I was taken back a bit. I half expected a basic answer of something along the lines of – only wire it the way we say to do it. This person went into detail of “WHY” with a simplified explanation. It’s exactly the answer I needed. I actually feel like I learned something.

I posted the manufacturers response on the Facebook post for the other C-Car owners to learn about as well.

Motor Cables

Yesterday I was able to put some cables onto the motor, switches, and controller. I wired up the main contactor solenoid to the motor controller and a small switch as a safety measure to prevent the solenoid from being activated while working on it.

The main contactor was flipped to allow the cable to the controller to be made shorter. The suppression diode was too close to the metal mount for the SW202 switch, so I bent it into a new shape that actually made it a bit more ridged and let me get my hands down into the area much easier.

I also started to setup a couple relays to allow 12 volts to pass to either side of the SW202 switch based on if the car is going in forward or reverse. While I was at it, I started labeling the wires so it would be easier to figure out how to connect everything up once I started running wires from the dashboard.

Cables installed allowing power to transfer between the main contactor, motor controller, motor reversing switch, and the motor.

Search for Parts

I found that out of 10 colors of automotive wire, I didn’t have pink. Pink is used to identify power for “reverse”. I went to a hardware, automotive, and farm supply store and couldn’t find the following:

  • Pink automotive wire
  • Relay with a 12v coil to pass 48v over the switch (actually, I couldn’t find any relays)
  • Battery side wall terminal

I’ve never really looked around an automotive store in the past. Usually I order something online and go to pick it up. I was shocked at how little the store seemed to have.

Gutting Old Parts

I pulled out the 48 volt and 12 volt battery chargers. I started removing all of the loose wires inside the battery compartment under the seat. I’ve got three of the original wires unthreaded from most of the zip ties leading to the front of the car. I was starting to run into a difficult time in the front part of the car.

The vent from the motor to the flap has been removed. I need to determine how to heat and defrost the car now that the motor can not support it.

Lithium Ion

Four battery modules from a 2015
Chevy Volt can fit into the CitiCar

I placed all four lithium battery modules in the car and found that I had enough room to place the battery charger under the seat as well. I’m considering the best placement while considering where the J-1772 inlet can be installed.

The battery modules had little nubs on the side that prevented them from sitting flush against the car. I cut them off and they now sit flush, giving an extra quarter inch to the space available beside them. I also noticed that the two newer chargers are missing the black cable that connects to the battery charger. I’ve been thinking about mounting some small angle brackets to the bottom of the battery box to prevent the modules from moving around while driving.

I’m still thinking about how to connect the four batteries. Each terminal is difficult to reach with the thick 2/0 wire terminals. I was considering adding a terminal fuse to each battery to have something to bolt onto for easier access. I also saw a copper butt seam flag connector as well that might work, letting me create two large wires rather than 10 smaller ones to connect them all together.

Motor Replacement

Ramps jack up the front quickly

The majority of the day was spent replacing the stock General Electric 48 volt motor with the ES-40D-56 from D & D Motor Systems. A local CitiCar enthusiast handed me a set of ramps from his garage, and it helped make the process of jacking up the car a bit quicker.

The first thing I did was to dethatch and remove the lead acid batteries.

A little boo boo from the motors weight

The process of taking the motor off of the car went pretty quick. I was aware of the seal that I had the break, and that I would have to be ready to catch differential fluid. Just like last time, the final step of lowering the motor from the car proved to be a bit difficult. My pinky finger ended up being crushed for a brief moment with 60 pounds of copper.

I had a question that I shot over to the C-Car community in how I could add the intake vent onto the new motor. In the meantime, I moved to the next thing I could tackle.

Removing cables

I started removing every battery and motor cable from the car. I was surprised to find that the main fuse for the motor itself was almost blown. Rather than one, the car had two separate fuses. One of the 250 amps fuses had already blown, and the second was on its last leg.

Fuse labeled as 250V. EAGLE UND LAB LIST 250A

Driving with only one semi-in-tact fuse is a bit concerning. I’ve seen the amps around 250 when starting to go up a hill, and once spiked at 350 amps. If I had continued to drive around with these fuses, I would shortly find myself in quite a pickle.

Controller Nostalgia

Although the motor controller no longer had any of the thick cables connected to it, I was able to confirm that the contactors would activate as I pressed down on the accelerator. I was delighted at the results and decided to keep the contactor.

The main contactor, series contactor, and reversing contactor tower

I’ve got a little project after the conversion to set up a special “user mode” that will activate the contactors while mimicking the original speed jumps/jerking with the motor controller.

Air Intake

I got a few conflicting responses, but the general consensus was that cutting into the case itself would compromise the integrity of the motor. I settled for drilling a few holes into the side of the motor plate, and threading two on the face to attach the original intake.

A rotary tool is used to cut bolts flush with the motor plate

I didn’t attach the vent for air to exit the motor. The D&D Motor has holes along the entire circumference on the other end of the motor. Another approach is needed to evaluate if the air can be captured, or if a different heating source should be used to heat and defrost the CitiCar.

Mounting the Plate

Motor plate with gasket maker around the shaft and each bolt

A thin material was found between the differential and the original motor plate. There was a red sealant in some areas as well.

I cleaned it off with break pad cleaner and then used a gasket maker to draw an outline of silicon around the hole and the bolts.

Afterwards, I tightened everything by hand and let it sit for awhile before tightening with a ratchet.

Motor Bumper

The splined motor bumper

I learned previously that many golf carts often have a spline motor bumper rubber grommet that sits inside the shaft to reduce the vibration of the motor shaft hitting the metal. I didn’t find it in the CitiCar’s stock motor, so I picked one up. I covered it in some grease and stuck it down into the new motors shaft.

New Motor

The last part was actually installing the motor. It was simply lifting it up on the jacks and tightening some bolts. Once the motor was in, I lowered the car. Without any batteries, I pushed it into the garage.

The new D & D Motor Systems ES-40D-56 motor is nestled in its new home
CitiCar Motor Replacement

Modern Motor Controller

Alltrax SR-72500 series motor controller

The motor controller for our little CitiCar has arrived! This is what will allow us to get the most efficiency out of the motor. The new controller will send 48 volts letting the motor operate at its full power, but pulsed based on how far the throttle is pressed. This gives you a large amount of torque at any speed.

Vanguard multi-voltage speed control

The original motor controller is a contact switch that provides an uninterrupted supply either 48, 24, or around 18 volts to the motor. The same voltage is applied in both forward and reverse.

Nichrome resistor

The first benefit happens when you press the pedal into the the first step. The muti-voltage speed control provides a low voltage by sending 24 volts through a large nichrome resistor. This resistor is often used for heating elements in toasters and deep fryers. Much of the energy is wasted as heat in the first voltage step. With the new motor controller, the full 48 volts is sent to the motor, but in very small pulses. Energy is used more efficiently rather than thrown away as heat.

Curtis PB-8 throttle potentiometer
CitiCar three step throttle switches

The next feature is with the throttle itself. The CitiCars have a three step throttle. There are three contact switches that close or open based on how far you press the accelerator pedal. I’m replacing the CitiCars throttle switches with a potentiometer, known as a pot box. This lets me gradually control the speed. With the existing setup, I have to keep switching between each switch position to control speed so I don’t go too fast or too slow.

When I press the throttle now, the motor immediately jumps with a lot of torque to get to the new speed. This wastes energy. The new motor controller will ramp up the speed gradually in a more efficient manor. It also has the ability to control how many amps are supplied to the motor so that I don’t blow a fuse. The original CitiCar controller lets the battery directly connect to the motor, letting the motor draw as any amps as it needs until a fuse is blown, or the load demand is decreased.

With the new controller, a complex switching of the batteries between a 48 volt and 24 volt configuration is no longer needed. The nominal voltage of the battery bank is simply 48 volts, all the time.

Next Steps

I don’t have everything just yet. There are still a few things that I need before I can switch over to the new setup. Until then, I’ve started reading over the schematics. I have planned out how to wire up the batteries to the motor and controller. I need to measure out new battery cable lengths and size of terminals to fit everywhere.

I purchased an F-N-R (Forward and Reverse) switch to swap the motors connections when traveling in reverse. Some owners just use the original CitiCar contactor for this. Rather than rely on old hardware, I purchased a new switch rated with the amperage that I needed along with suppression diodes. I also ordered a contact switch with a diode and pre-charge resistor.

I was messing up on the coil voltage when ordering switches. I’m working with two voltages – 12 volts and 48 volts. 48 volts is for the motor, but the voltage is also stepped down to 12 volts to control lighting, switches, and accessories. It gets confusing when ordering equipment because it’s not clear which voltage to choose from, since the equipment itself also works with two separate voltages. In the end, make sure its the accessory voltage for the coils (12 volts in my case), or you’ll need to use relays to control your relays.

Initial planning stages of how to wire up batteries, motor, controller, fuse, and switches under the seat.

Voltage

Alltrax does provide a cheaper controller that works with up to 48 volts. However, I was told that the motor I am getting would be capable of running off of 72 volts as long as there was plenty of forced cooling. In that scenario, I wouldn’t need to buy a new controller – just a new set of batteries. Batteries don’t last forever. If there is one thing to know, it’s that voltage equals speed. The more volts you have, the faster you can go.

In other news

  • D & D Motor Systems responded that my motor will be ready to ship in 2-3 days
  • D & D Motor Systems has shipped out my contactor switch
  • I’ve been purchasing misc stuff from AliExpress
    • Hazard Light Switch
    • GPS Speedometer
    • Switch panel for a racing car engine (race mode – alltrax user mode)
    • Flashing relay switch
    • 12v socket TPMS
    • Car Bluetooth MP3/USB/SD/FM/AUC decoder board audio modules
    • Current meter battery capacity monitor
  • Two more 48v Chevy volt battery modules have been shipped
  • I’ve filled out a return/replacement request for my portable EVSE
  • The lithium charger might be drop shipped sometime at the end of the week
  • Waiting for Zero J1772 adapter with C-19 plug from Tuscan EV
  • EV Drives is processing my order for a F-N-R switch, and has updated the coil voltage
  • I was able to connect to the Alltrax controller via USB
  • A cassette adapter arrived. Plans are to pull out the head and throw it into an 8-track tape.
  • A few magazines arrived with CitiCar articles in them, and posted on the Magazines page.

Motor Performance Test

I heard back from D&D Motor Systems this morning. It seems the motor is a stock motor – no temperature or speed sensing. I’ll need to figure out what to do in regards to the speedometer.

One of the other CitiCar owners I’ve been speaking with mentioned he was considering using a speedometer based on GPS. My concerns with GPS is in situations that you are unable to receive a signal. I want to know my speed immediately, in real time, with accuracy, regardless of where I am. I’m lacking in the accuracy department at the moment where my speedometer seems to think I’m going 4 miles faster than I really am. Perhaps I need to inflate my tires.

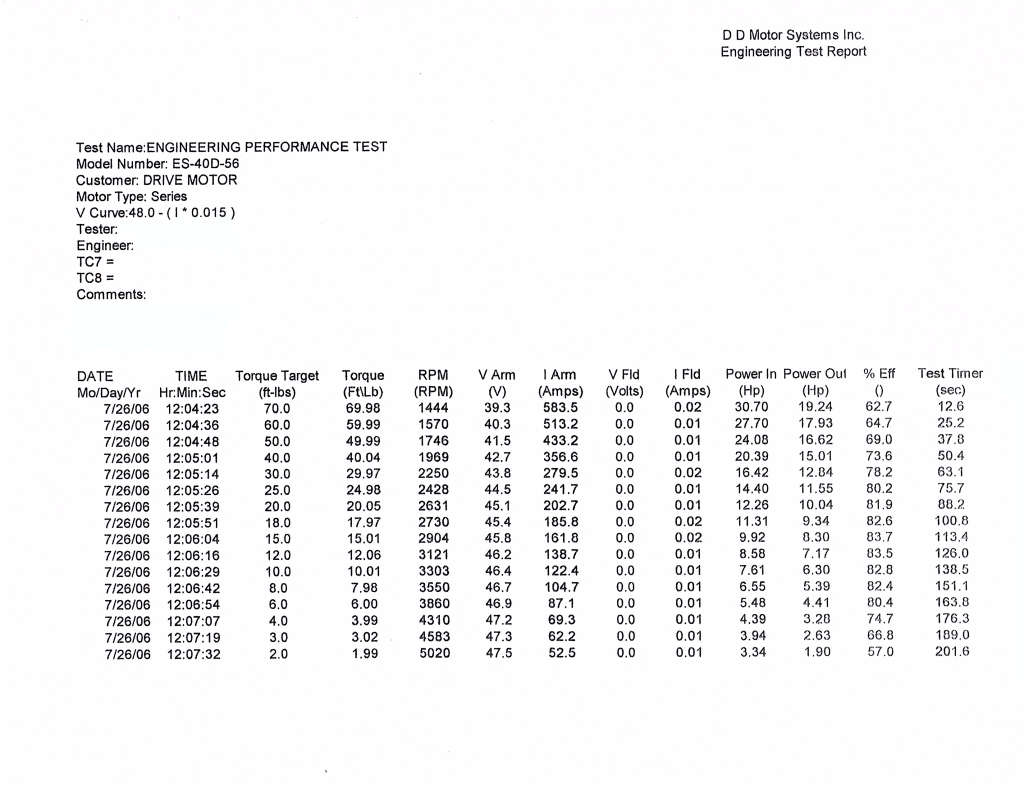
Along with a few answers to my questions, D&D Motor Systems also sent along a performance report of the motor.

Engineering Performance Test for ES-40D-56

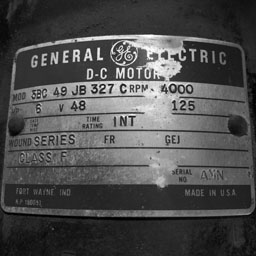
The stock motor that came with the car has the following information on its plate:

Ratings Plate on a stock 6HP CitiCar Motor
RPM4000
HP6
V48
A125
WoundSeries
Time RatingINT
ClassF
MOD5BC 49 JB 327 C
Serial NoAMN
CitiCar specifications on a 6HP motor

I’m not clear on how to compare motors. At first, I thought it was simply comparing which motor had the most horsepower. However, HP is variant based on the load. Voltage is similar. RPM’s… Let’s just say there is so much involved when comparing motors. I had to start reaching out for something to compare.

ComparisonStockD&D Motor
RPM40001444 – 5020
Amps12552.5 – 583.5
Horsepower6in: 3.34 – 30.70
out: 1.90 – 19.24

I feel a bit confused. The motor is both better and worse… I’m certain I’m comparing apples to oranges here since I don’t have a similar table for the stock motor. I’ve heard from another CitiCar owner that the amps can shoot up pretty high on the stock motor while going up a hill. This brings me to wonder, how did General Electric know what to stamp into the motor plate?

As stated in the owners manual, the CitiCar has a 250 amp fuse on the motor.

The same is true driving up long, steep hills. By driving in first speed, and sometimes second speed, under these conditions, you are likely to blow the Citicar’s 250-amp fuse located in the controller box behind the seat.

CitiCar 1976 ½ Owners Manual, Sebring-Vanguard, 1976, page 19

The Mother Earth News article about the CitiCar in Israel had also mentioned the range of amps with the stock motor.

Although initial current draws can reach 500 amps, the average pull at cruising is around 100 amperes.

Israel’s Solar Powered Car, The Mother Earth News, September/October 1980, page 120

Even at that rate, it appears that the new motor will have cruising speeds at 50 amps; half of what the CitiCar can do.

I plugged the performance numbers for the ES-40D-56 motor into an excel spreadsheet and started making some graphs. I like visuals, and I thought it may reveal a pattern and help to compare against with the stock motor that came with the CitiCar.

I saw lots of compounding curves. I wasn’t sure if I was onto something, but I started out comparing RPMs. At 4000 RPM, I assumed the CitiCar motor would use 125 amps and deliver 6 Horsepower – the ratings on its motor plate.

I tried to make a few formulas in the spreadsheet. At 4000 RPM, the new motor would be using around 75 Amps and 4.7 HP. If that’s the case, it’s got a much higher efficiency at only half the amps with less HP to maintain that load/speed. Unfortunately, I’m thinking in a linear scale, so at 4000 RPM’s, it would be just a bit higher for HP and amps – but not by much.

I’m learning about electric motors, and slowly grasping at how to compare them. I believe it will be an improvement. If my calculations are correct, this means that the motor can go further on the same amount of energy.

Coupling the improvement in the motors efficiency with an actual motor controller will further extend the range. I also purchased two more batteries last week to double the range and lessen the load on each of the Chevy Volt batteries.

Other News

In other news, the garage has been cleaned to a point that it is actually organized. Shelving units for indoor gardening have been broken down and moved back into the garage. I have a whole shelving unit dedicated to CitiCar parts. I even have my screw drivers all in one place. Usually I’m having trouble just finding one screwdriver – but now I’m having trouble fitting them all into one container.

Holding CitiCar motor in place

After a great deal of effort, the stock motor is back on the car. The thing is very heavy and difficult to move around while you are laying on the floor.

Battery terminal with nut

A battery nut arrived in the mail, but again – it’s too small. I decided to order nuts that are 7/16 in size, as well as in metric for M8 and M10. I feel like one of those has got to work.

I started on replacing the differential fluid over the weekend, but I got stuck trying to remove the breather cap – which you shouldn’t do. After watching a few videos, I found the filter and drain plugs. I had three #8 Allen wrenches to remove the drain plug, but I had to order a #10 for the filter plug.

I purchased an old General Electric Motor Bumper for a club car to put inside the armature after I saw a video of someone mentioning not to forget to transfer the bumper into your new motor. It’s supposed to help make the motor a little quieter. Maybe… we shall see. I like the wine the motor makes. I just didn’t see it inside my motor and would like to try it out.

I also started playing with an Aukey DRA5 dash cam.

Products

D&D Motor Systems ES-40D-56
25 Qty 7/16-14 Zinc Plated Serrated Flange Hex Lock Nuts (BCP272)7/16″ > 3/8″
Flange Nuts Hex Lock Self-Locking Metric Thread Serrated Nut 304 Stainless Steel Assortment Kit 125Pcs,M3 M4 M5 M6 M8 M10 M12Metric #8, #10 > 3/8″
Pico 0852PT 3/8″ Stainless Steel Battery Hold Down Stud Nut 2 per PackageToo small
EKLIND 14620 10 MM Long Series Hex-L Key allen wrenchFilter Plug
Chevy Volt BMS w/Bluetooth for 48v 12 cell battery w/cell balance & charger contgoes with batteries
NEW Lithium Ion Chevy Volt 48vdc 2kwh 50ah battery Golf Cart Off Grid Solar EVmore range, shares the load
Club Car Electric GE Motor Bumper (Fits 1982-Up)Curious on quiet noise
AUKEY Mini Dash Cam 1080p Full HD Dash Camera with 1.5” LCD Screen Car Camera with 170° Wide-Angle Lens, G-Sensor, WDR, Motion Detection, and Clear Night RecordingFor fun…
Stuff I’ve purchased / ordered

Motor Quote

I’ve been working with D&D Motor Systems to upgrade the motor on my CitiCar. I’ve gotten to learn a bit more about my car while I was gathering information to pass along to them.

I heard back from them today. They offered a motor with part number ES-40D-56, and provided an outline of the motor to review. It looked like the motor was 11.45 inches long, and 6.7 inches in diameter. It was much longer than my 9 inch motor. It will just barely fit within the space that I have available.

ES-40D-56 Motor Outline by D&D Motor Systems, Inc.
Vanguard Multi-Voltage
Speed Control

One thing I noticed is the placement of terminals was different. All of the terminals are the furthest away from the motor control. Given the wires were at the exact length needed, I would need to replace them with longer wires. I’ll need to upgrade my motor controller to use the new motor, so I may just put it in the battery box next to the terminals and use really short wires. After all, I’ve seen 1D10CRACY do the same thing with his controller placement in one of his videos, and it looked like a really efficient way to set things up.

1D10CRACY: Installing the Chevy Volt batteries into the CitiCar

They asked me to make sure that the pilot on the motors mounting a plate along with the four holes used to mount the plate to the trans-axle were the same as my existing motor.

Frame where motor bolts onto axle

I must admit, I’m a bit confused about this. I’m not sure what an “A Plate” is, and I didn’t see any measurements for the pilot screws Maybe there are measurements, but I am unable to identify them. I was going to print out the outline, but I found that it wasn’t at 1:1 scale to line up with my motor or axle to compare.

The motor can run off of either 48 or 72 volts. This is great since I’ve already purchased some 48 volt lithium batteries. But now I’m wondering if I should look into a 72 volt system. The problem would be that the 48 volt batteries would sit, doing nothing. I found a few things online that have my concerned about the voltage, as well as in the motor outline itself. It seems this may actually be a 36/48 volt motor.

The price for the motor is $635 + freight with a lead time of two weeks. The price motor seems to be around the ballpark figure I was considering. I’ve got so much stuff with a long lead time, that waiting two weeks before they can build the motor isn’t going to be a problem.

Jacks holding up motor on CitiCar

If this is the same as the motor on golf cart catalog only rated for 2825 RPM, it would appear this would lower my cars maximum speed from 36 down to 26 mph. At almost half the horsepower, I imagine it wouldn’t have any pep trying to accelerate.

I’m wondering if my math is off, or if I’m just not thinking about electric motors in the proper way. I keep thinking that motors have got to be more efficient today compared to 45 years ago, but in the end, they are still composed of about the same amount of copper. I simply don’t want to buy a new motor if it’s worse than what I have. Maybe it’s the motors controller that makes all of the difference.

I asked for more information

  • What are the specifications? RPM/HP/Amps
  • What is the type? Series, shunt? Does it support regenerative braking?
  • Does it have a heat sensor? How hot is too hot?
  • Is it compatible with a speedometer cable? Is there a way to detect how fast it is spinning?
  • How far apart are the pilot holes in the outline?
  • Are there recommended controllers for this motor?
  • How heavy is it?

Now that they have no more need of additional details about my car, I can put the original motor back on until I have everything to replace the drive train. That thing was heavy. Maybe I should wait a few weeks…

Delayed

After a few days, I called over to the front desk. I hadn’t heard back from the engineer and I thought maybe he had sent me a standard part number that sales would have all of the specs for. Perhaps I could just go through sales to get the info I needed and order over the phone. I called in and… they paged him. He seemed friendly and all, but I felt horrible for bothering him. Just my luck, a part used in the motor has been used up, and the lead time is three to four weeks now. He explained that he hadn’t gotten to his email over the past few days to see my questions on the specs and that he’d look over it and get back, if not tomorrow, then after the weekend.

I must admit, the company seems a bit more on a personal level. I feel that most companies are a faceless corporation. With D&D Motor Systems – I’m talking with people. I’m talking with an engineer – directly – one on one. Like – me of all people… no chain of command of twenty or so managers, team leads, salesman, and what not – where details are lost and conversations are difficult to have in real-time.

The Egg Before The Chicken

I’ve had quite a bit of fun driving the CitiCar. I want to go further, and a little faster up hills. The main drawback on range is that the battery capacity in my car is very low. I could upgrade to a proper set of batteries to match the manufacturers recommendation, but I would be shelling out one to two thousand dollars based on quality and composition. However, if I am going to upgrade the motor as well, I should wait on the batteries until I’ve chosen a motor, as it may need a different voltage. Both options are costly, and doing both doesn’t seem to make sense. If I go for the batteries, there is a chance I will not upgrade the motor unless it fails, and then the battery voltage of what I already have will heavily dictate what motor I will get.