
Dragging Wire
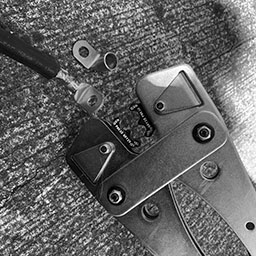
Someone warned me that the wires were hanging from the bottom of the CitiCar when I drove up to a car show (that was canceled) on the weekend. They offered a zip-tie, but I thought I had fixed it by pulling up the wires and rearranging the batteries by time they came back with it. Unfortunately, I should have taken them up on their offer. I noticed the wire had been dragging against the pavement. It’s time to get serious on changing over the powertrain.

There are a few reasons why this is happening now. The first is that the speedometer cable had been removed, which prevented the wire from going below the motor. However, the latest change was the most impactful. I had installed the motor controller and contact switches. In doing so, I moved the batteries and their wires out of the way so I could get into the area easier. I have the wrong batteries, so there is plenty of room. I think they are moving around while driving, and the motor cables just move along with them.
This is a serious issue. The cables need to be repaired immediately before I drive the car again. It’s questionable on how much of an impact this will have on the amount of amps that the wire can handle now that it’s lost some copper. There is another concern that when driving in parallel, one set of batteries will have less resistance because it has a bigger “pipe” for electrons to flow through.
The new power train is going to be a tight fit, so this will not be a problem afterwards.
Custom Cables
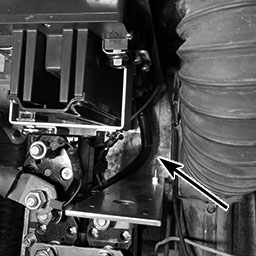
Now that the motor controller and contact switches are installed in the CitiCar, I started moving onto wiring them together. The wires I had were either too short or a bit too long.
I started creating a custom cable. I’m not sure how good my crimp is, so I kept crimping the lug multiple times until the whole length of it seemed to have been crimped. Luckily, I realized that I needed to get some heat shrink before crimping the next lug.
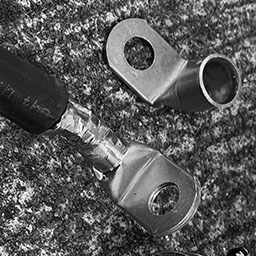
Teddy and I took the SUV over to the local hardware store tonight. A pack of 5/8″ heat shrink has two tubes that are six inches long. The instructions said to add two inches to the measurement to handle the 4:1 shrinking ratio, so I picked up four packages.
The heat shrink didn’t really shrink that much in terms of length. It seems like I could have gotten away with much less slack. My custom wire looks a bit more professional – to me.

After the battery cable cooled down, I installed it into the CitiCar to connect the motor negative terminals between the motor controller and the reverse contactor switches.

Charging Cycle
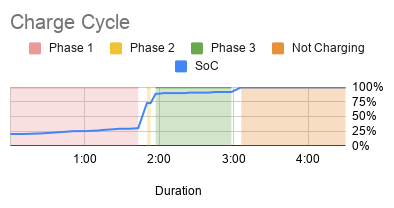
I got a charge cycle that stopped due to an over-voltage fault. The high voltages at the end of the charging cycles are fairly concerning. After exhausting the CitiCar batteries on a long trip, I kept a fairly close eye on a full charge cycle, recorded the data, and made a few charts:
| Time | Min Remaining | Amps | Amp-Hours | Volts | SoC | Phase |
|---|---|---|---|---|---|---|
| 9:34 | 798 | 20.9 | 0 | 51.0 | 20% | Phase 1 |
| 9:45 | 803 | 20.6 | 4 | 51.7 | 20% | Phase 1 |
| 9:59 | 789 | 20.4 | 9 | 52.2 | 21% | Phase 1 |
| 10:13 | 775 | 20.2 | 14 | 52.7 | 23% | Phase 1 |
| 10:26 | 762 | 20.1 | 18 | 53.2 | 25% | Phase 1 |
| 10:35 | 754 | 20.0 | 21 | 53.5 | 25% | Phase 1 |
| 10:45 | 746 | 19.8 | 24 | 53.8 | 26% | Phase 1 |
| 10:49 | 740 | 19.8 | 26 | 54.1 | 27% | Phase 1 |
| 10:56 | 732 | 19.6 | 28 | 54.6 | 28% | Phase 1 |
| 11:02 | 727 | 19.4 | 30 | 55.0 | 29% | Phase 1 |
| 11:10 | 719 | 19.1 | 32 | 55.8 | 29% | Phase 1 |
| 11:17 | 712 | 18.7 | 35 | 57.3 | 30% | Phase 1 |
| 11:24 | 357 | 11.9 | 37 | 57.4 | 73% | Phase 2 |
| 11:27 | 355 | 10.2 | 37 | 57.4 | 73% | Phase 2 |
| 11:31 | 200 | 9.0 | 38 | 58.2 | 89% | Phase 3 |
| 11:34 | 198 | 9.0 | 38 | 60.9 | 89% | Phase 3 |
| 11:37 | 194 | 9.0 | 39 | 64.7 | 90% | Phase 3 |
| 11:41 | 190 | 9.0 | 39 | 66.1 | 90% | Phase 3 |
| 11:45 | 186 | 9.0 | 40 | 66.9 | 90% | Phase 3 |
| 11:50 | 182 | 9.0 | 41 | 67.3 | 90% | Phase 3 |
| 11:54 | 177 | 9.0 | 41 | 67.6 | 90% | Phase 3 |
| 11:59 | 172 | 9.0 | 42 | 67.9 | 91% | Phase 3 |
| 12:05 | 167 | 9.0 | 43 | 68.0 | 91% | Phase 3 |
| 12:09 | 162 | 9.0 | 43 | 68.0 | 91% | Phase 3 |
| 12:14 | 158 | 9.0 | 44 | 68.1 | 91% | Phase 3 |
| 12:19 | 152 | 9.0 | 45 | 68.1 | 92% | Phase 3 |
| 12:24 | 14 | 9.0 | 46 | 68.1 | 92% | Phase 3 |
| 12:32 | 7 | 9.0 | 47 | 68.0 | 92% | Phase 3 |
| 12:40 | 0 | 0.0 | 48 | 55.8 | 100% | Not Charging |
| 12:54 | 0 | 0.0 | 48 | 54.1 | 100% | Not Charging |
| 1:03 | 0 | 0.0 | 48 | 53.9 | 100% | Not Charging |
| 1:10 | 0 | 0.0 | 48 | 53.8 | 100% | Not Charging |
| 1:27 | 0 | 0.0 | 48 | 53.7 | 100% | Not Charging |
| 1:36 | 0 | 0.0 | 48 | 53.6 | 100% | Not Charging |
| 2:04 | 0 | 0.0 | 48 | 53.4 | 100% | Not Charging |


Over Charging
The charging voltage maxed out at 68.1, each 12 volt battery got up to 17 volts. I hadn’t gone up past 14.5 with regular car chargers in the past. It seems as if the batteries are being overcharged. If they were being equalized/balanced, it would make a bit more sense. This is during the final phase after it reaches 90% charge.
Exaggerated Estimates
The initial estimate was 13 hours and 18 minutes, where the actual charging duration was three hours and six minutes. As the charger progressed through each phase of the cycle, it was getting better, but still highly exaggerated. The device is not learning from its previous charges.
Huge SoC Gains
The state of charge is sometimes abrupt. The state of charge increases gradually until it is at 30% charge at 57.3 volts. Seven minutes later, the battery state of charge jumps to 73% at 57.4 volts. Another seven minutes and we are at 89% charge at 58.2 volts. We then grow gradually up to 92% over an hour, and then jump directly to 100%.
Short Phase 2
Phase 2 is a very short cycle, that is 20 minutes at most. The cross over between dropping amps and increasing reported SoC by 50% is very sharp.
Charger Conclusion
It seems like the Lester Summit Series II charger may be defective or had the wrong battery profile. The CitiCar has four 12v Interstate 31-ECL in series. The battery profile (22001) description seems fine other than the amp hour rating. When I called up the manufacturer, the amp hours (190 RC@25 amps) wasn’t a problem and I was told that the default profile was fine.
- Single-voltage mode: 48V flooded/wet lead-acid battery packs with a 20-hr rating of 225-260 Ah
- Auto-voltage mode: 48V, 36V, or 24V flooded/wet lead-acid battery packs with a 20-hr rating of 225-260 Ah
- Profile parameters: 22A bulk (48V), 25A bulk (36V), 25A bulk (24V), 2.39 VPC absorption, 9A finish, Progressive DV/DT termination, equalize active
I wish the charging status was more descriptive rather than saying “Phase 1”, “Phase 2”, and “Phase 3”. The phases do not convey any information. It would be more useful to see something like Desulfation, Bulk, Absorption, Float, and Equalize.
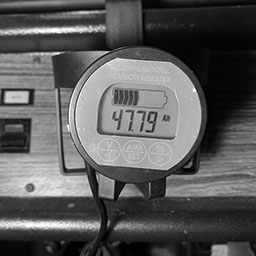
Capacity Monitor
The capacity monitor arrived. This was one of the last major components of the new system that I had been waiting for. It was fairly simple to setup and I started getting feedback immediately on the amount of amps the CitiCar motor uses when initially starting or going up hills and cruising.
It seems to go around 250 at most, but occasionally has small spikes at 350. Cruising appears to be around 125 amps. I’ll need to put a camera on it while driving to look back later to get a more accurate reading of data.
One special thing of note is that I’m now aware of how much phantom power is being drained. The battery charger and capacity monitor both consume a small amount of amps.
The capacity is not useful for driving at this point because the detected voltage keep swapping between 24 and 48 volts. Once I upgrade the CitiCar to always use 48 volts, the capacity should become useful. However, it does appear to be fairly accurate reporting the same number of amp hours that the battery charger reported.

Question about your capacity meter. My 1980 Comutacar has 10 6 volt batteries, each just over 200 AH’s. A total of just over 2000 AH’s. It is listed at 999, what are your thoughts? Do you think it would work?
Thanks
Neil
LikeLike
At 60 volts in series, you would have a 12 kWh battery back, but still only have 200 AH. If you’ve got it wired up as 30 volts (5 in each series), you would have 400 AH. Both configurations are still within range for the battery capacity monitors range.
LikeLike
Thanks, I had my math mixed up.
I just installed new batteries today.
Haven’t decided on a battery monitor yet.
LikeLike
It’s also important to get the correct shunt size and wires that can handle the amps the motor draws. On a 48v system, I usually see around 250 amps, but goes up to 300 when accelerating up a hill, and once got up to 350. My Alltrax motor controller can be programmed to limit maximum amp draw, but I got the biggest shunt I could find.
LikeLike
I’m looking at the 500 amp shunt. Still working on a few items.
Thanks for the suggestions.
Neil
LikeLike