
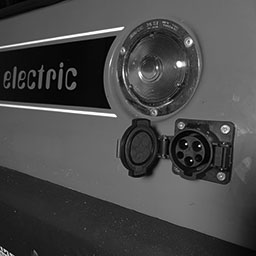
The J1772 inlet has been installed onto the tail end of the CitiCar. I no longer need to unlock the trunk and drag out a socket on the end of a long cord to plug in.
The body of the car only offers a few places to put the socket. My original goal was to install it next to the exiting inlet for power from the house. The area surrounding it was obstructed by the door hinges on the inside, or had “electric” written in vinyl on the outside of the car.
I settled for a ridged area by the passenger tail light in the back. There are holes by the contactors that were originally used for the battery and motor cables. I can thread the cable from the adapter to the charger.
Removing Wires

I removed the three wires from the battery compartment all the way to the dashboard. One was already identified as being for the volt meter. The thicker wires were discovered to lead up to the charger.
While I was at it, I removed the volt meter and found that it had a round hole in the dashboard behind it as opposed to a square hole to match its shape. The hole is too small for the AiLi volt meter. I would prefer to keep the original volt meter and try to control the voltage fed to it with an Arduino to represent the capacity rather than the voltage.
Wiring Harness
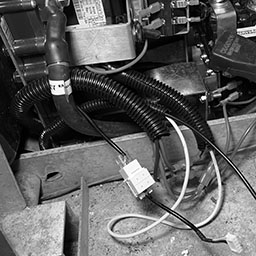
Wires were thread from the font of the car to the battery compartment through a split loom zip-tied to the aluminum frame. I drilled a hole slightly behind and to the left of the throttle to pass all of the wires through. They connect up to the motor controller and the reversing switch. Short extensions were setup for each connection so that I don’t need to reach into tight spaces to disconnect the wires.

When I was trimming the excess split loom tube within the CitiCars battery box, I cut through one of the cables still inside. It was the AiLi battery monitor cable. The cable contains 4 tiny wires, surrounded by strands of what appears to be another line acting as a shield. I had some left over networking Cat6 connectors and keystones and wires up each side to make a solid connection.
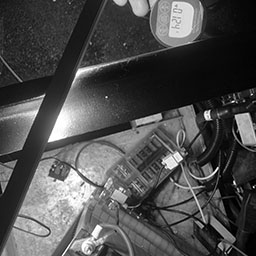
I was able to hook one of the Chevy volt batteries up with a dc-to-dc converter and a light to confirm that the AiLi meter was reading the correct voltage and change in current as I flipped the switch on and off.
This wasn’t so bad after all. I would have probably ended up doing this anyway. The wire was too short to reach the shunt to begin with. Now that everything has a network connector, I can create an extension cord to reach the shunt in its final position.
Racing Use Only
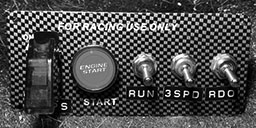
One of my favorite pieces of flair is the racing switch panel for a car that can’t go faster than 35 mph. I got out my old label maker and labeled the different switches. Each switch is a project on its own.
AMPS
The “AMPS” is the “User Mode” wire on the motor controller to let it switch driving profiles. A driving profile can change the maximum amps the motor is allowed to draw.
START
I’m considering how to approach this. I have the CitiCar play a sound of an engine revving up to race, or play a random list of custom sounds.
RUN
The run switch is to turn on the 12 volt DC-to-DC 12 volt converter to use the lights, fans, horn, etc. The car will not operate without this being flipped up.
3SPD
The is going to setup the car so that the motor controller only sees three different positions when the throttle is pressed. It will also allow the original contactors to activate. It will mimic the speed and sound of the original motor controller in the CitiCar.
RDO
This is the power to turn on the radio and amp.
In other news
I ordered some battery side terminals that another C-Car owner has proposed.
I purchased another SW202 switch, but with 48 volt coils. I will no longer need to use relays to provide 12 volt power to the coils.
I’ve composed a document asking the community for help setting up a maker space and talked to a couple people about it.
Hello,
I need help setting up a “Maker Space” within, or near the town of Front Royal, Virginia.
A maker space is a collaborative workspace with a wide variety of equipment available to use that would otherwise be inaccessible to the general public due to costs, electrical requirements, zoning, noise, ventilation, and space. A maker space may consist of a wood shop, machine shop, electronics workstation, 3D printers, computers, embroidery machines, and even Lego building blocks. This educational building’s purpose will be to have fun making stuff, and learn from others making stuff.
I attended the Art Institute of Pittsburgh in 1994, majoring in Industrial Design Technology on a scholarship. I long for the days having access again to a large workshop with a very wide range of industrial equipment. I also went to Mineral County Technical Center in West Virginia for Carpentry, and loved the computer lab along with the art, shop, and mechanical drafting classes throughout middle and high school. My profession took off with the information technology (IT) industry programming software, but I have always retained my creativity making things at home.
Like many others, I often find myself justifying the need to purchase a new tool, machine, or a large surplus of supplies that may have limited use to me. Afterwards, these products collect dust in the garage until someone “borrows” it, to then collect dust in their own garage. As tools, materials, and past projects accumulate, it becomes difficult to find space to store them while keeping my workspace clear of debris.
Some maker spaces not only provide a workshop, but also rent out storage and artist spaces for your own personal work area or show room within the building, providing members 24/7 access. In addition, many offer classes and training, including STEM educational programs.
I can not do this alone. I have a goal, but this is bigger than me. My intent is to set this up as a non-profit organization. Because a maker space can expand and offer such a wide range of equipment and materials to adults and children, I am looking for help from the community.
● Form a board of directors and a mission
● Draw out makers already within the community
● Identify community needs & interests
● Provide ideas & imagination
● Find funding & sponsorship
● Consolidate and acquire equipment, tools, and materials
● Find a location for light industrial usePlease contact me if you can help,
Lewis Moten, October 15, 2020, Maker Space Proposal
Lewis Moten
(###) ###-####
********@gmail.com
https://www.facebook.com/lewis.moten
