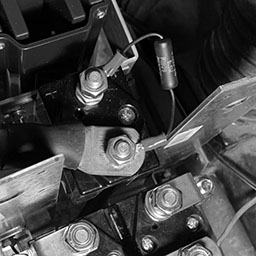
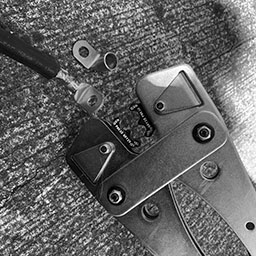
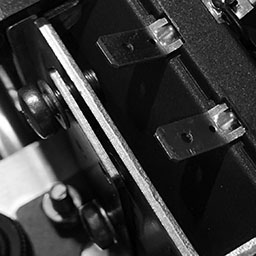
The A311 angle brackets are in the way of the cable in between them
Yesterday I was about to work on running a cable from the main contactor to the Alltrax motor controller B+ terminal. I was using one of the short wires that I received from a local enthusiast of CitiCars. The A311 angles were in the way when trying to bend the wire.
A311 angle brackets bent over to allow cable to pass over them
I spent a great deal of time bending the tops down backwards over the SW202 motor reversing switch. Part of the problem was bending the brackets while they were still in the car. The other part was that I just didn’t have the tools available to do it properly. It wasn’t easy, and it wasn’t clean, but I got the job done.
Now that the brackets are bent over, they provide an additional surface to mount things to. They seem a bit high in where they are bent. The cable itself is under too much stress. I’m reconsidering how to attach it in the most beneficial way.
Bending the mounting brackets
PlugShare
I’ve been using PlugShare to find charging stations. They let you pick your car from a list, but I had to choose “Other”, which just showed a tarp over a sedan. I sent customer support (Ticket #70359) a request a couple weeks ago to let me choose a custom name other than “Other”, along with my own image of the car.
They got back today and added a “Sebring Vanguard Citicar” option, and asked if it was compatible with J1772 connections, to which I replied:
Stock model from the 70s is only compatible with level 1 chargers. A lot of us CitiCar/Comuta Car owners have been modifying them with J-1772 adapters, lithium battery, and chargers that support up to 240v.
PlugShare app displying Sebring Vanguard CitiCar recognized as a type of electric vehicle
A few others on the C-Car Facebook group confirmed that they too were able to add their CitiCars and got a kick out of it with plenty of excitement. It feels like these little cars are getting a little bit of validation in their place in history.
Fuming Mad
TLDR; gas smells bad
Ramble
I haven’t been to a gas station since February. Partly due to the fact that my primary vehicles were inoperable for awhile. A dead battery due to just not driving the car, and the SUV had problems trying to shift it out of park. Both vehicles are up and running now.
I had an in-person doctors appointment and decided to take the hour-long trip in my car since it gets 45 miles to the gallon compared to my gas guzzling SUV. I only drive the SUV occasionally to keep the battery charged and to pull my RV – but camping is canceled during the pandemic.
Anyhow, I’m running on, getting off topic.
Fumes
So my car had maybe 70 miles left, so I stopped to get some gas. I could smell the gas station! I hadn’t smelled anything like that since I was a kid. I thought the smell went away when everyone switched to unleaded gasoline. And the smell was stuck on my hands afterwards.
So yea… I just found it curious.
Rant
Don’t sit behind a Ford Mustang GT at a drive through. The fumes and loud noises are unbearable. I just kept imagining how much money the driver was spending to get me high. Every drive-through has cars just idling, wasting gasoline. One of the largest parts of a car is dedicated specifically to making the engine quieter. The mustang had two tail pipes and it was still very loud when idling. It makes me wonder how much louder the engine could get without it.
Big Rebuild
Seeing the bare copper in the wire that rubbed against the asphalt has made me rethink things quite a bit. I haven’t driven the CitiCar since then. Given my other vehicles are working now, I’m considering taking that giant leap and start replacing everything, starting with the motor.
The weather is still good for working outside. I also believe that I have everything that I need now. Wire, switches, monitors, batteries, charger, adapter, motor, controller, contactors, etc. I need to push this project forward.
Other news
My racing switches arrived today along with another tiny radio head unit for Bluetooth and microSD cards. The switches mounting plate looks like it is too high to put it where the stock radio is usually installed.
Switch mounting plate is too tall to put into the area for the radio
Someone warned me that the wires were hanging from the bottom of the CitiCar when I drove up to a car show (that was canceled) on the weekend. They offered a zip-tie, but I thought I had fixed it by pulling up the wires and rearranging the batteries by time they came back with it. Unfortunately, I should have taken them up on their offer. I noticed the wire had been dragging against the pavement. It’s time to get serious on changing over the powertrain.
Wire exposed within 2/0 battery cables from dragging on asphalt
There are a few reasons why this is happening now. The first is that the speedometer cable had been removed, which prevented the wire from going below the motor. However, the latest change was the most impactful. I had installed the motor controller and contact switches. In doing so, I moved the batteries and their wires out of the way so I could get into the area easier. I have the wrong batteries, so there is plenty of room. I think they are moving around while driving, and the motor cables just move along with them.
This is a serious issue. The cables need to be repaired immediately before I drive the car again. It’s questionable on how much of an impact this will have on the amount of amps that the wire can handle now that it’s lost some copper. There is another concern that when driving in parallel, one set of batteries will have less resistance because it has a bigger “pipe” for electrons to flow through.
The new power train is going to be a tight fit, so this will not be a problem afterwards.
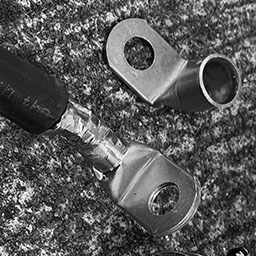
Custom Cables
Now that the motor controller and contact switches are installed in the CitiCar, I started moving onto wiring them together. The wires I had were either too short or a bit too long.
I started creating a custom cable. I’m not sure how good my crimp is, so I kept crimping the lug multiple times until the whole length of it seemed to have been crimped. Luckily, I realized that I needed to get some heat shrink before crimping the next lug.
Big tools to crimp big wire terminals
A battery lug that has been crimped one too many times
Teddy and I took the SUV over to the local hardware store tonight. A pack of 5/8″ heat shrink has two tubes that are six inches long. The instructions said to add two inches to the measurement to handle the 4:1 shrinking ratio, so I picked up four packages.
The heat shrink didn’t really shrink that much in terms of length. It seems like I could have gotten away with much less slack. My custom wire looks a bit more professional – to me.
A custom 2/0 battery cable with right-angled terminals and heat-shrink tubing
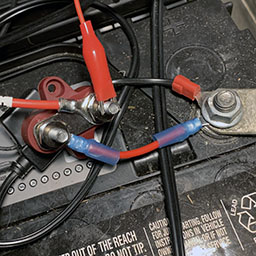
After the battery cable cooled down, I installed it into the CitiCar to connect the motor negative terminals between the motor controller and the reverse contactor switches.
Custom cable connected to motor controller motor negative (M-) terminal
Custom cable connected to SW202 motor reversing switch motor negative terminal M-
Installing my first cable
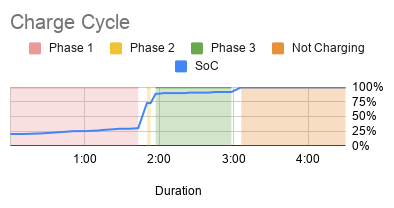
Charging Cycle
I got a charge cycle that stopped due to an over-voltage fault. The high voltages at the end of the charging cycles are fairly concerning. After exhausting the CitiCar batteries on a long trip, I kept a fairly close eye on a full charge cycle, recorded the data, and made a few charts:
Time
Min Remaining
Amps
Amp-Hours
Volts
SoC
Phase
9:34
798
20.9
0
51.0
20%
Phase 1
9:45
803
20.6
4
51.7
20%
Phase 1
9:59
789
20.4
9
52.2
21%
Phase 1
10:13
775
20.2
14
52.7
23%
Phase 1
10:26
762
20.1
18
53.2
25%
Phase 1
10:35
754
20.0
21
53.5
25%
Phase 1
10:45
746
19.8
24
53.8
26%
Phase 1
10:49
740
19.8
26
54.1
27%
Phase 1
10:56
732
19.6
28
54.6
28%
Phase 1
11:02
727
19.4
30
55.0
29%
Phase 1
11:10
719
19.1
32
55.8
29%
Phase 1
11:17
712
18.7
35
57.3
30%
Phase 1
11:24
357
11.9
37
57.4
73%
Phase 2
11:27
355
10.2
37
57.4
73%
Phase 2
11:31
200
9.0
38
58.2
89%
Phase 3
11:34
198
9.0
38
60.9
89%
Phase 3
11:37
194
9.0
39
64.7
90%
Phase 3
11:41
190
9.0
39
66.1
90%
Phase 3
11:45
186
9.0
40
66.9
90%
Phase 3
11:50
182
9.0
41
67.3
90%
Phase 3
11:54
177
9.0
41
67.6
90%
Phase 3
11:59
172
9.0
42
67.9
91%
Phase 3
12:05
167
9.0
43
68.0
91%
Phase 3
12:09
162
9.0
43
68.0
91%
Phase 3
12:14
158
9.0
44
68.1
91%
Phase 3
12:19
152
9.0
45
68.1
92%
Phase 3
12:24
14
9.0
46
68.1
92%
Phase 3
12:32
7
9.0
47
68.0
92%
Phase 3
12:40
0
0.0
48
55.8
100%
Not Charging
12:54
0
0.0
48
54.1
100%
Not Charging
1:03
0
0.0
48
53.9
100%
Not Charging
1:10
0
0.0
48
53.8
100%
Not Charging
1:27
0
0.0
48
53.7
100%
Not Charging
1:36
0
0.0
48
53.6
100%
Not Charging
2:04
0
0.0
48
53.4
100%
Not Charging
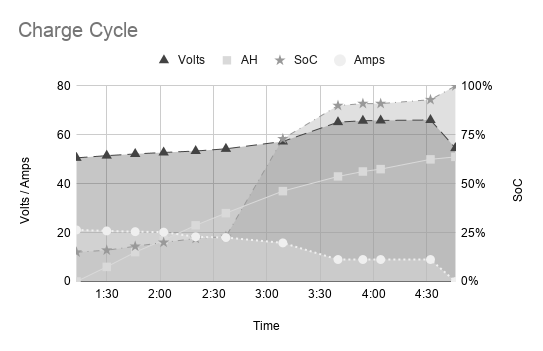
The state of charge always jumps by 50% in a short period of a few minutes during phase 2
Estimated time remaining is always off by about 400%
Phase 2 appears to be a very abrupt cross-over compared to charging profiles for lead acid batteries around the internet
Over Charging
The charging voltage maxed out at 68.1, each 12 volt battery got up to 17 volts. I hadn’t gone up past 14.5 with regular car chargers in the past. It seems as if the batteries are being overcharged. If they were being equalized/balanced, it would make a bit more sense. This is during the final phase after it reaches 90% charge.
Exaggerated Estimates
The initial estimate was 13 hours and 18 minutes, where the actual charging duration was three hours and six minutes. As the charger progressed through each phase of the cycle, it was getting better, but still highly exaggerated. The device is not learning from its previous charges.
Huge SoC Gains
The state of charge is sometimes abrupt. The state of charge increases gradually until it is at 30% charge at 57.3 volts. Seven minutes later, the battery state of charge jumps to 73% at 57.4 volts. Another seven minutes and we are at 89% charge at 58.2 volts. We then grow gradually up to 92% over an hour, and then jump directly to 100%.
Short Phase 2
Phase 2 is a very short cycle, that is 20 minutes at most. The cross over between dropping amps and increasing reported SoC by 50% is very sharp.
Charger Conclusion
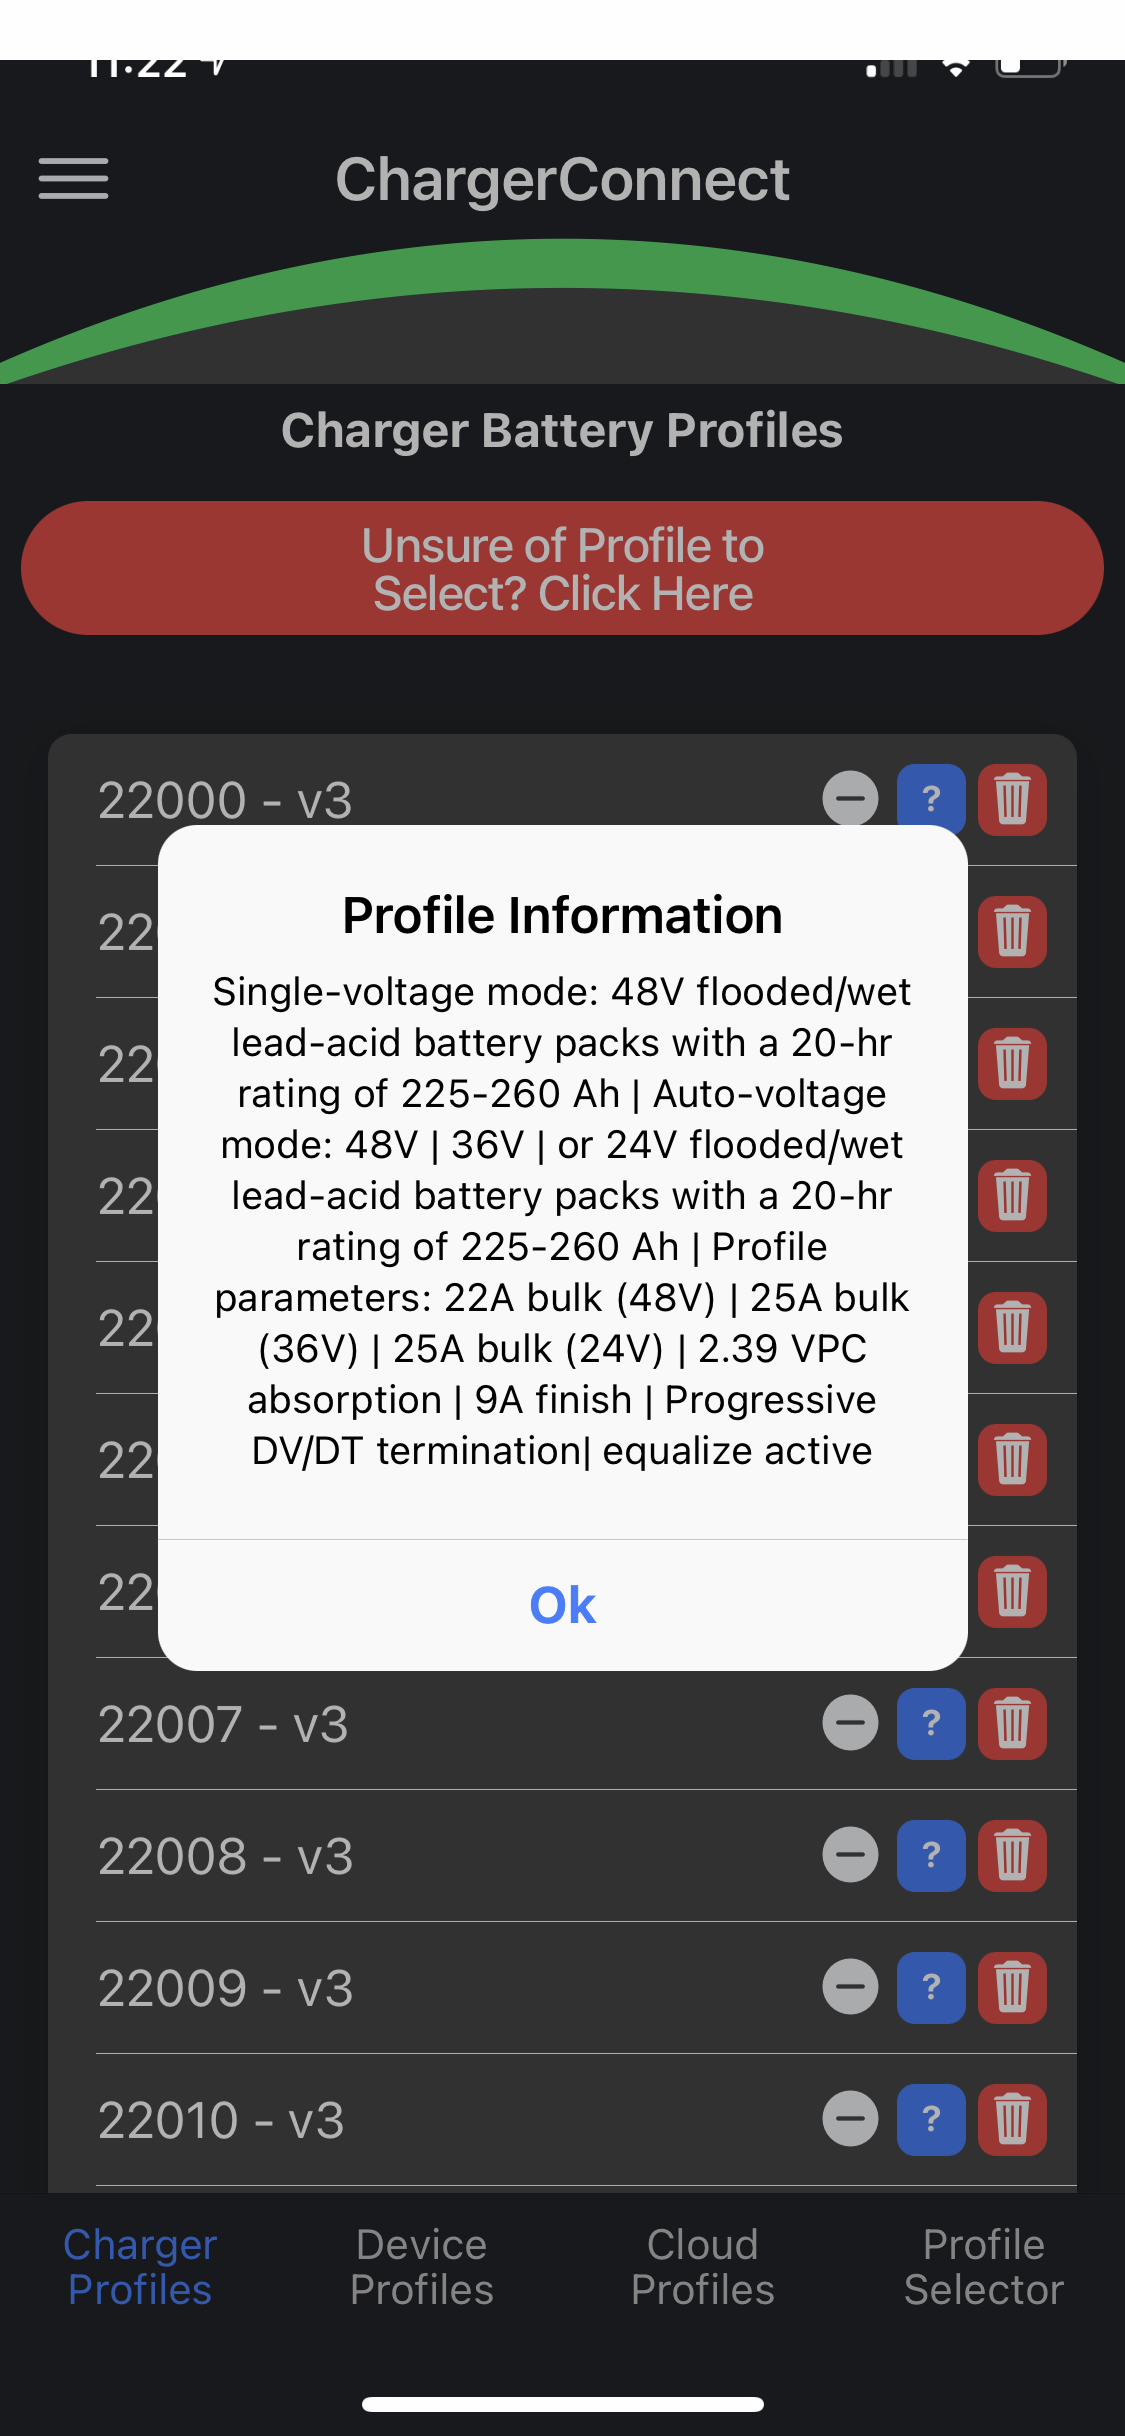
It seems like the Lester Summit Series II charger may be defective or had the wrong battery profile. The CitiCar has four 12v Interstate 31-ECL in series. The battery profile (22001) description seems fine other than the amp hour rating. When I called up the manufacturer, the amp hours (190 RC@25 amps) wasn’t a problem and I was told that the default profile was fine.
Single-voltage mode: 48V flooded/wet lead-acid battery packs with a 20-hr rating of 225-260 Ah
Auto-voltage mode: 48V, 36V, or 24V flooded/wet lead-acid battery packs with a 20-hr rating of 225-260 Ah
I wish the charging status was more descriptive rather than saying “Phase 1”, “Phase 2”, and “Phase 3”. The phases do not convey any information. It would be more useful to see something like Desulfation, Bulk, Absorption, Float, and Equalize.
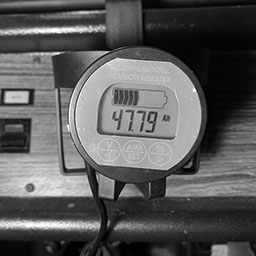
Capacity Monitor
The capacity monitor arrived. This was one of the last major components of the new system that I had been waiting for. It was fairly simple to setup and I started getting feedback immediately on the amount of amps the CitiCar motor uses when initially starting or going up hills and cruising.
It seems to go around 250 at most, but occasionally has small spikes at 350. Cruising appears to be around 125 amps. I’ll need to put a camera on it while driving to look back later to get a more accurate reading of data.
One special thing of note is that I’m now aware of how much phantom power is being drained. The battery charger and capacity monitor both consume a small amount of amps.
The capacity is not useful for driving at this point because the detected voltage keep swapping between 24 and 48 volts. Once I upgrade the CitiCar to always use 48 volts, the capacity should become useful. However, it does appear to be fairly accurate reporting the same number of amp hours that the battery charger reported.
The capacity monitor is more precise on the number of amp hours supplied by the charger
Teddy and I hopped into the CitiCar for some night driving on a pizza run Friday night. With 30 minutes to spare, we headed to the town square to kill some time, only to find it was packed for a major event. Apparently we stumbled upon a political rally. I decided to execute operation “Outlaw of the Squeeze”.
The little CitiCar can fit in most places where other cars can not
The two spots in front of the portable toilets where open. I was able to park the car far enough away so that everyone still had plenty of room.
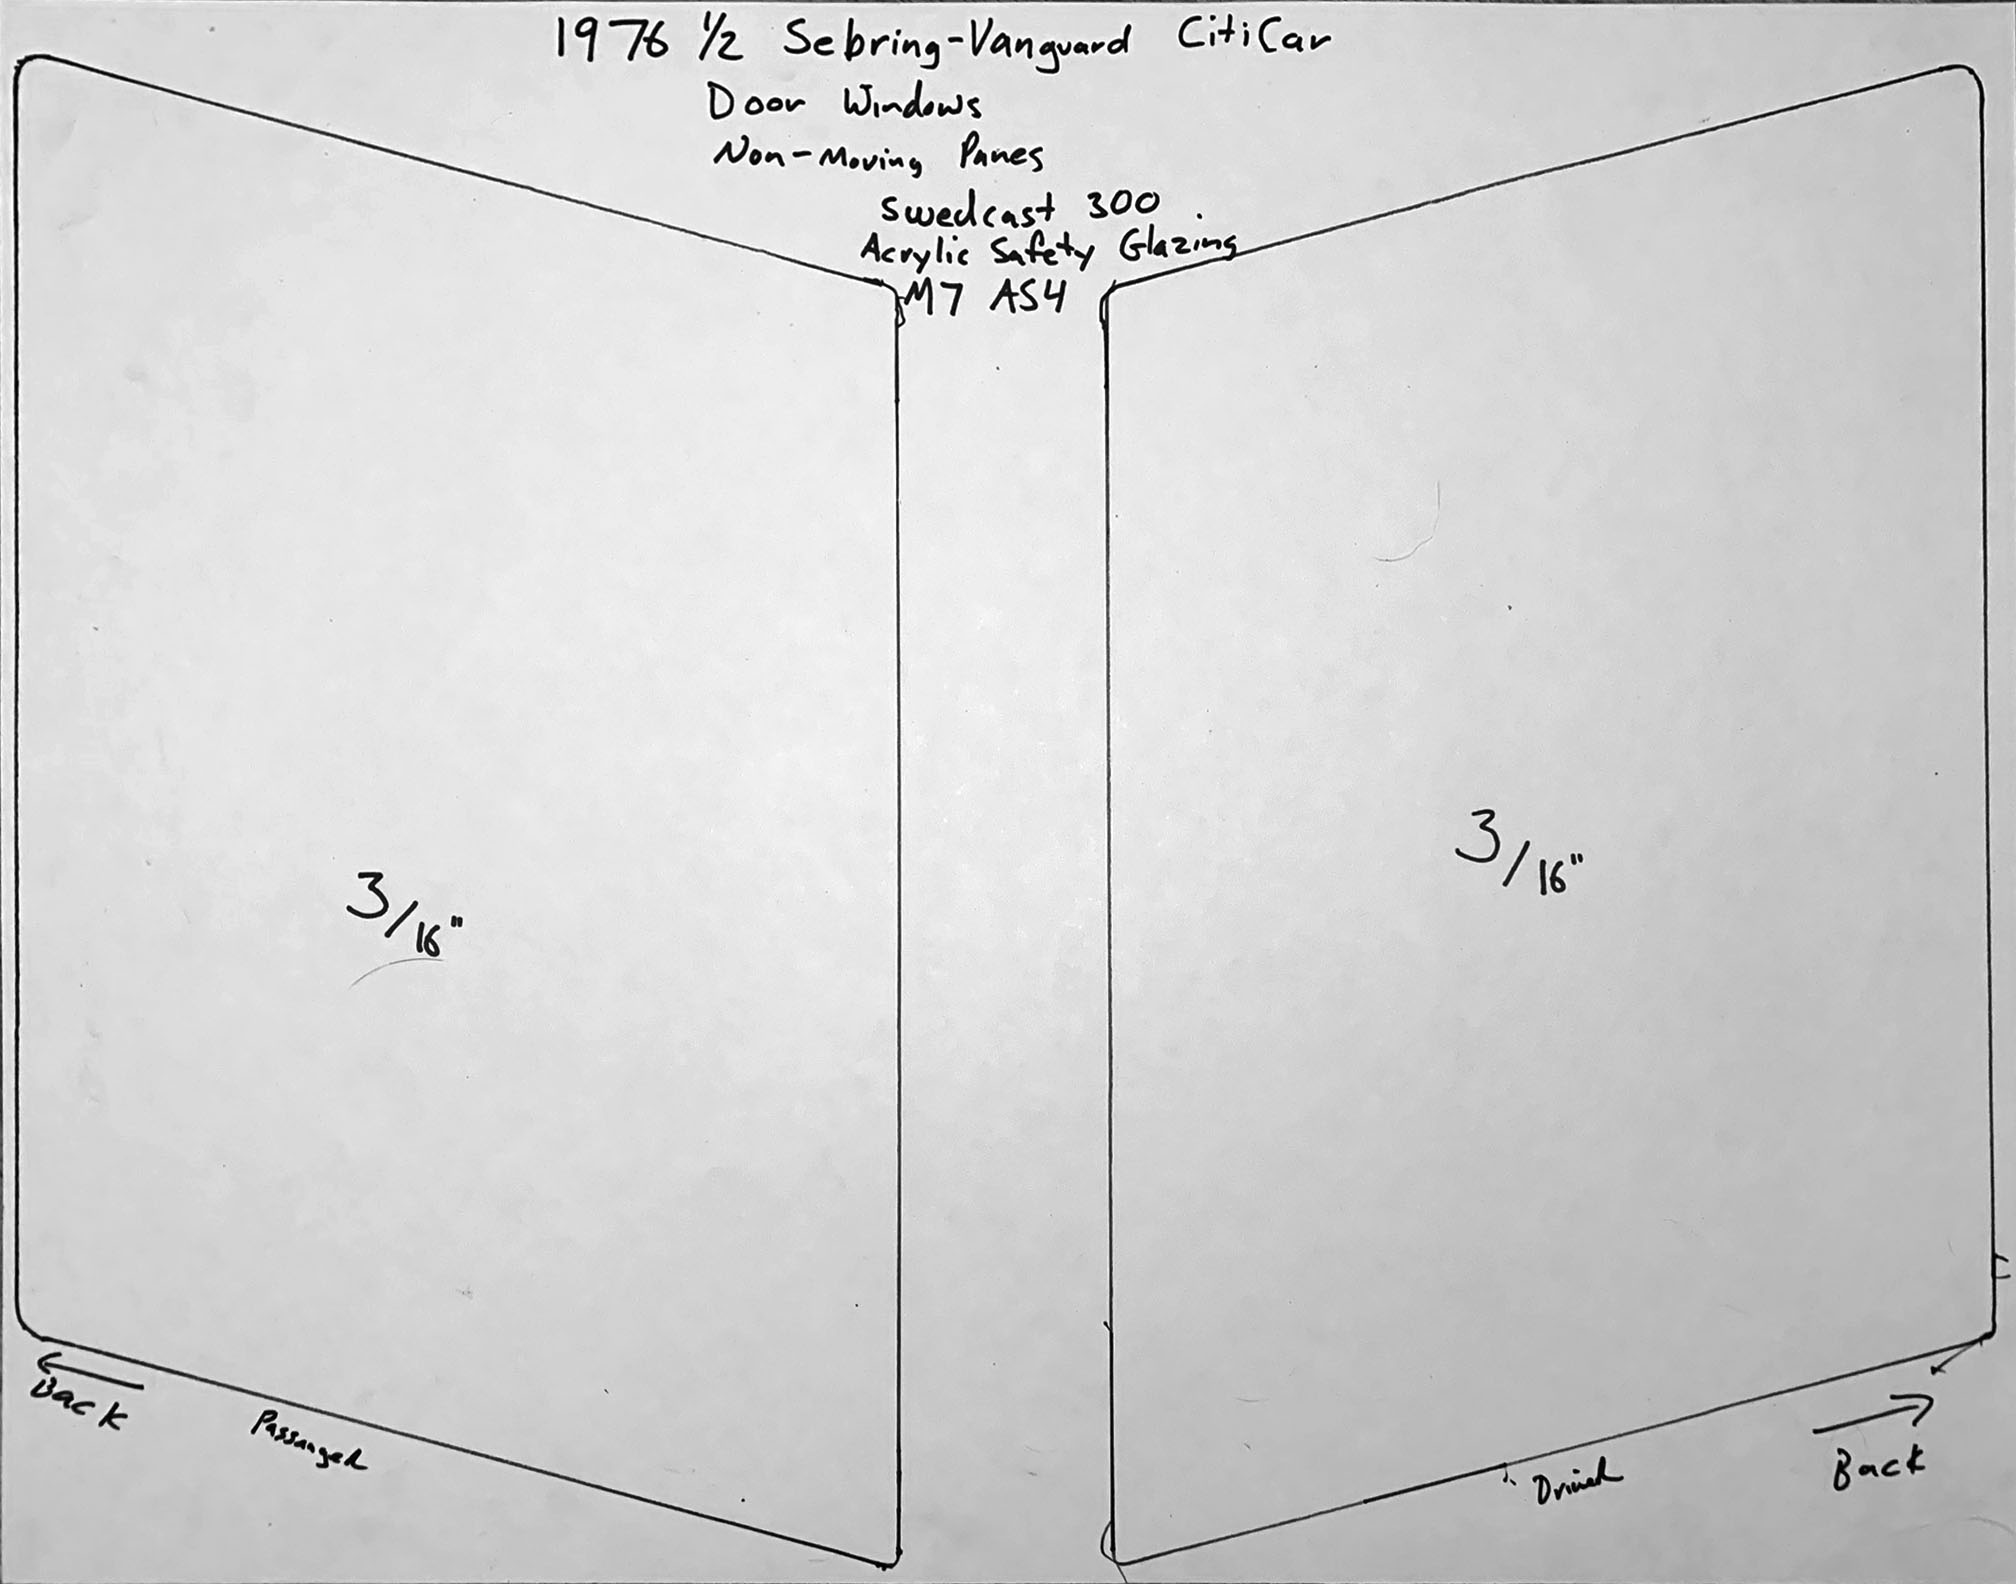
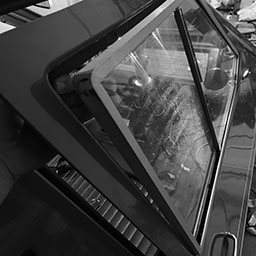
Door Windows
I took the door windows to Dixie Plate Glass & Mirror. They recommended popping out the panes. They had 50 contract orders, and wouldn’t be able to get to it until after Christmas. I went home and popped out the window panes. Unfortunately the aluminum frames cracked. There was a lot of glue on the panes, and it was difficult removing them.
Door windows with panes separated
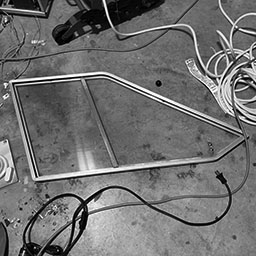
I continued on and traced everything. I took a few measurements and brought everything back. Unfortunately they don’t carry anything that is 3/16″ thick. They order the materials in bulk for large contracts. If I could find the material myself, they could cut the parts for me. I’m having a tough time finding acrylic with safety glazing.
CitiCar sliding pane templates laid out on 22″ x 28″ white poster board
CitiCar fixed pane templates laid out on 28″ x 22″ white poster board
The car is much quieter driving without windows. It feels like I’m driving slower. All of the noise seemed to have been amplified with those windows.
I’ll need windows soon. It’s getting colder and I can’t drive in the rain anymore. Locking the vehicle while parked is pointless.
Cup Holder
The Colonel is first in line to test out the new cup holder
Drive-through restaurants weren’t really that big in the 70’s. McDonald’s opened it’s first drive-through in the year prior to my CitiCar being built. That’s why the creature comforts in my car are an ash tray and a cigarette lighter.
I went ahead and ordered some cup holders. I didn’t’ realize how oversized they were. They hang perfectly onto the defroster vents, but I’m often tilting the drink against the window to slide it down into the holder.
Charging Stations
Jack Evans Chevrolet
A CitiCar tucked next to the service center while charging
I went back to Jack Evans Chevrolet while it was staffed during my lunch break. I talked with one of the service men by the other charger to see what the guidelines were on using the charger. They just said pull up and charge.
Being in front of the garage door, it feels like the car is in the way. The charging station is in a fairly odd spot. I pushed the car as close to the wall as I could to keep it out of the way.
A CitiCar packed at a public charging station
TownePlace Suites
A penny for your thoughts
A hotel was just built outside of the city this year. It has a public charging station – but it has a fee. I was curious to walk through the process. I tried it out and was able to test charging. In my four minute experiment, I was charged a penny. I thought it would bill me for the full hour. For now, I’ll stick to the free charging station across the street from it.
I liked how the charger had a screen giving you the current status and statistics during the charging processes.
Being charged by time, rather than the amount of energy consumed seems a bit off. I’m consuming about 20% of the rate that other vehicles can consume – which means I’m paying five times more than everyone else.
100~240 Car Battery Charger
A 12v battery charger arrived that can run on between 100 and 240 volts. At this point, all of my CitiCar onboard chargers now support both standard house power and the voltages found at public chargers. Using the ST-3000 EV charger power converter, I was able to confirm that both chargers were able to charge the car when supplied with 240 volts. At this point, only the J1772 adapter is needed on the converter.
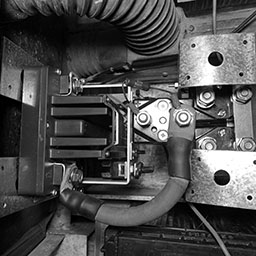
Motor Controller
Fabricating mount for motor controller in CitiCar
Most of the day was spent installing the motor controller and switches. I continued to evaluate multiple aspects of where everything would be located once the powertrain was fully replaced.
Fabricating the mounting hardware was fairly simple. A while back, I picked up four strong-tie A311 A Angles that are usually meant for fastening posts down to concrete. Part of the fun was tracing parts and drilling a mirror image by clamping two fasteners opposing each other.
The contactor switches and motor controller were fairly heavy, and caused the angles to wobble. I settled on having two separate mounts.
Forward/Reverse contactors on separate A Angles from motor controller and main contactor.
National Night Out is next Tuesday. After picking up lunch at Popeyes, Teddy and I headed over to the new Front Royal police department in our CitiCar to pick up a little “Thin Blue Line” flag and a 3 watt blue light. Afterwards, we headed over to Chimney Field park.
The Blue Line flag and a blue light
I need to pick up a little inverter so I can use my bedside lamp with my car to power the light during their cruise for the event. I tried to see how to affix the flag to the car, or just put the flag itself on the radio antenna, but I wasn’t having much luck.
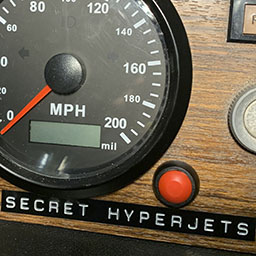
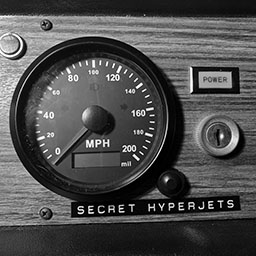
Red Button
Trip odometer button
In the movie, Spaceballs, Barf switched the Eagle 5 to use Secret Hyperjets on the Eagle 5 to go into hyperactive. Men in Black had a hyperdrive on their car. Hyperdrive mode was activated by a red button that allows you to drive on the ceiling of a tunnel to bypass traffic.
With a recommendation from the C-Car owners group, I swapped out the trip odometer button for a red one. It’s already been catching peoples attention quicker.
Little red trip odometer button for secret hyperjets
Door Windows
I talked a bit with my neighbor regarding the various windows on the vehicle. He repairs automotive glass, but nothing like what the CitiCar has. He had some insight regarding the blue tint on most vehicles, having a company get measurements in case the back window breaks, and what could be done about the side windows.
I called up a company he recommended. Their first response was that they don’t do curved auto-glass. They seemed pleased that I am able to pop out the side windows and bring them in. I’ll take them over later in the week. Hopefully they can pop out the acrylic panels from the frames.
Sliding windows popped out of CitiCar doors
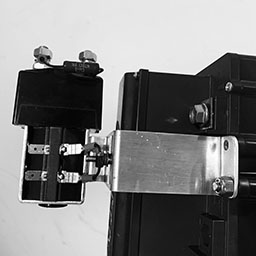
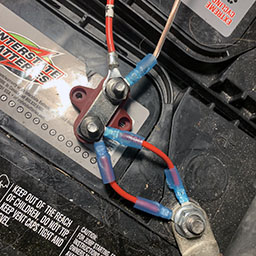
Contactor Mounting Bracket
Mounting bracket screws are too long
The wrong mounting hardware came with the Albright SW180 main contactor switch. The bolts were too long and could not tighten any further once they pressed against the solenoid. I found a bracket kit from Arc Components Limited located in West Yorkshire, England and had the parts imported.
Albright Bracket Kit Part No 2159-047
Main contactor switch secured onto Alltrax motor controller
The mounting hardware was perfect and looked fairly similar to the hardware used on the SW202 Forward/Reverse contactor switch.
Now that the contactor switch is secured, I can start modifying some steel brackets to affix the motor controller and FNR switches onto.
As a bonus, I got a little magnet from the company to put on my refrigerator.
Refrigerator magnet from Arc Components Limited, West Yorkshire, England
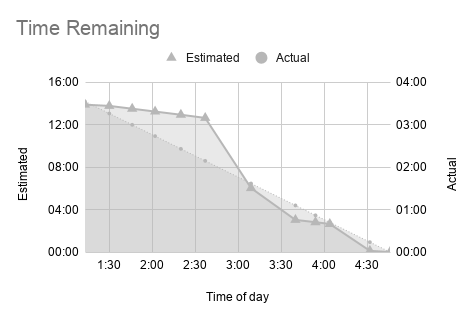
Lester Charger
I’ve been talking with tech support for the Lester Summit Series II charger regarding the egg smell, high voltage, large jump in SoC, and odd estimates being off by hours.
So far, things seem like it might be normal. Problems may be due to the age of the batteries, and that the batteries should wear in after a few charge cycles. I think the estimates being off by a factor of four may be due to the low number of amp hours the batteries have. The range that I have on the CitiCar also seems to be about a quarter of what it should have if it came with the proper batteries.
Here is the data from a charging cycle along with some visual graphs.
Time
Est Min
Amps
AH
Volts
SoC
Estimated
Actual
1:13
834
21.1
0
50.6
15%
13:54
03:33
1:30
827
20.7
6
51.5
16%
13:47
03:16
1:46
811
20.4
12
52.2
18%
13:31
03:00
2:02
795
20.2
17
52.8
20%
13:15
02:44
2:20
777
18.3
23
53.4
22%
12:57
02:26
2:37
759
18.0
28
54.3
23%
12:39
02:09
3:09
362
15.8
37
57.3
73%
06:02
01:37
3:40
182
9.0
43
65.2
90%
03:02
01:06
3:54
169
9.0
45
65.8
91%
02:49
00:52
4:04
159
9.0
46
65.9
91%
02:39
00:42
4:32
7
9.0
50
66.1
93%
00:07
00:14
4:46
0
0.0
51
54.6
100%
00:00
00:00
A high voltage applied to the 48v battery bank, and an odd 50% jump in SoC within a half hour
Graph indicating estimates are four times longer than actual charging time
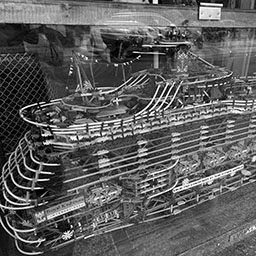
Todays trip was a quick visit to the town square. We hadn’t taken the CitiCar to Main street for a while. I saw that the store next to the ice cream shop had an eight and a half foot cruise ship made out of K’NEX called K’nector of the Seas, made by Glenn Mikulak. It’s just impressive with how large and detailed it is.
K’nector of the Seas Stern
K’nector of the Seas Bow
I found this website about Glenn and his model ship: www.glennship.com
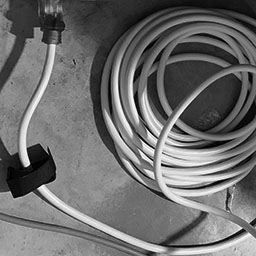
Thick Wires
Thick 12 gauge extension cord next to a thinner extension cord
With yesterdays notice of warm wires, I headed off to the hardware store tonight and picked up the thickest gauge extension cord that I could find. I found a 50 foot heavy duty extension cord that was made of 12 gauge wires. Technically, it’s thick enough for 20 amps. As for the power strip itself, I found a three foot extension cord that was also made of 12 gauge wire, but also had a three plug splitter on the end. I am no longer worried about that wire heating up.
Scratched Window
Scratches and pitting in passenger window
The driver and passenger windows have quite a bit of pitting that’s noticeable in the right light. It’s difficult to see, but it’s something that keeps bugging me ever since I purchased the car. I’ve started looking at how to fixe the problem.
One of four knobs on the passenger door keeping the window secured
The 1976 1/2 CitiCar has four thumb-screw knobs keeping the window held in. Once they are removed, the window can be removed by pushing it out from the inside. After pushing the window out, I noticed the crack on the passenger door wraps around under the window.
Passenger door window being popped out from the CitiCar.
I unscrewed the window handle and laid the window on the garage floor. I cleaned up the window with a towel and tried to buff it with some polishing cleaner. Although the window looked cleaner, the pits and scratches remained.
Passenger door window with window handle just above it
One of the things I noticed in one corner of the non-movable pane was a label indicating the material was made of Swedcast 300 Acrylic Safety Glazing M 7 AS4. I found that SWEDCAST 300 was registered by Swedlow Inc. in Garden Grove, California
Label indicating door window material
Half of me is thinking it would be better to replace the panes with real glass or something similar to what is there now. It’s late. This repair job will continue tomorrow…
Teddy and I headed over to Gertrude in the CitiCar late in the evening. It was getting into the twilight hours, and we had our lights on. Arriving back home and hooking up the charger, I noticed the cover for the contacts was fairly warm. I’m concerned that there is some arcing going on, or too many amps are passing through. It could also have something to do with the proximity of the new charger next to it.
Back to Front
I removed four of the 12 volt battery chargers in the back of the CitiCar as well as their quick disconnect plugs from the battery terminals. I moved the last 12v charger to be next to the accessory battery. I sat the Lester charger next to it as well. I got underneath the car and ran the charging wires from under the seat to the front of the car. While I was down there, I ran an extra set of wires to the front to hook up my battery meter.
Chargers moved to front of car along with a battery meter.
I no longer need to open up the seat to check the voltage. The Lester charger bumps the voltage so high that the volt meter no longer operates until the batteries stop charging. Unfortunately, the wires and chargers look like a giant rat nest.
High Current
The charging app had settings for the cable size at 12 gauge. I have a smaller 14 gauge wire from the battery to the terminal bus bar, but the app wouldn’t let me select a smaller size. To work around the problem, I added an extra 14 gauge wire to both the positive and negative busbar terminals.
Two 14 gauge wires are used to support the current of a 12 gauge wire
I’ve noticed that the wires for the power strip and the Lester charger tend to heat up. The Kill A Watt meter shows a 20% higher wattage being used than the charger is rated for. My goal is to wire up the outlet in the front of the CitiCar to a standard household outlet, and remove the power strip. I’ve also noticed a smell of spoiled eggs when charging. I keep leaving the garage door open just to feel like I’m doing something that might be safer.
I’ll need to wire up a J1772 inlet into the same line, but first I need to find a 12 volt charger that can sense if it is connected to 120 or 240 volts.
Interference
I saw a video on YouTube where someone was demonstrating the effect aluminum has on detecting GPS satellites. I moved the speedometer GPS sensor to another part of the car.
In other news
Rather than splitting out my biweekly deposit through weighted positions in my portfolio, I decided to throw it at Tesla. The companies stock usually does so well that my deposits usually go to everything else that is underweight unless I manually intervene. I feel like I’m playing catch up. It’s nice to finally see the number of shares rather than just the price going up for a change.
The Lester summit series II charger has been tucked into the back of the car. I talked with the Lester tech support and found that the default charging profile is fine for the batteries that I have, and that the “bubbling” is a very important part of the charging process. I also asked about the battery state of charge remaining at 100% after driving around. The response was that the SoC will not update until you connect to AC power. I don’t like the idea of it reporting outdated SoC information, but sure enough, it updated once I plugged the charger in.
I broke my previous record, pushing the limit to 11.1 miles on one charge. The speed at which the Lester charger can replenish the batteries is phenomenal. It was charging at 3.11 miles per hour compared. This is four times faster than the average 0.8 mph charging rate. The watt per hour has come down 25% from the first charge on the Lester, but it’s still a bit high.
The increased recharge rate is giving new life into the car. I really want to get the new lithium batteries installed. I took a second trip today just because I could. I’ve driven 16.3 miles in the CitiCar today.
I went ahead and soldered wires to one of the replacement buttons I got for the GPS speedometer. I removed the broken one, wired everything together, and confirmed that it now resets the odometer. I no longer need to bend over and ground a loose wire on the cigarette adapter to reset it.
Odometer button labeled as Secret Hyperjets
Just for extra fun, I used my Dynmo 1550 tapewriter. I labeled it “Secret Hyperjets”, a reference to the Spaceballs Eagle 5 going into hyperactive. I’m not bold enough to claim that my CitiCar has a plaid mode.
I also spent a little bit more time aligning the steering wheel again.
“I Voted” sticker given out to voters at Front Royal, VA Registrars office after voting
Today is Tesla battery investor day. A vacation day was in order. A quick trip to the registrar for some early voting was followed with a relaxing vacation day with Teddy.
Happy Creek flows past a pavilion in Gertrude Miller community park
Gertrude, as with most trips, was first on our list of destinations. Teddy slowly made his way around the park. We hung out on the side of happy creek by the wooden overlook. Small fish were swimming about, and Teddy found an old mangled baseball in the creek.
Teddy sits behind the CitiCar at Kentucky Fried Chicken
We were soon on our way over to KFC. I made sure to ask for a cup holder since the CitiCar doesn’t have a place to hold drinks.
CitiCar parked in the shade of a tree
One of the great things about a CitiCar is that you can back into a space half-way, and have quite a bit of room to sit on the curb and lay out your meal on the ground behind the car. In Teddy’s case, I’m able to put a cup of water and some ice cubes on a lid that he can’t knock over and spill.
Teddy, with a little custard ice cream on his nose, is as happy as happy can be
The next stop was at B&L Custard. The owner asked us where our little red car was. I pointed, but a larger car was obstructing her view. Teddy had his usual “Pup Cup” and got a bit messy with it. I had a strawberry shortcake sundae in a waffle bowl.
CitiCar parked at Bowman Park in Front Royal, Virginia
Next on our little trip was a visit to Bowman park. It’s a small park that I rarely visit, and we hadn’t driven to the the park with the CitiCar yet. A few picnic tables and benches are scattered throughout about an acre of land on a gradual incline. The park has very old and thick trees. Acorns were falling fairly often, but I didn’t see any squirrels.
Sidewalk through Bowman Park in Front Royal, Virginia
Laying against a tree for awhile, I had started to lose track of time until the church bell rang at half past four. It was time to be on our way back home.
Lewie and Teddy laying against a large tree at Bowman Park in Front Royal, Virginia
New Charger
The Lester Summit Series II charger arrived while we were out on our little trip through town. I plugged the car into the regular battery chargers and started to look over the instructions for the new charger, attaching wires and screwing the cover on. Tesla Battery Investor Day started while I was going over the details and I had a live stream playing while I continued to work on the charger.
Busbar with wire that has large enough ring terminal to go around battery terminal
The ring terminals that came with the charger were too small for the battery terminals that came in the CitiCar. I created a pair of wires with ring terminals large enough to connect to the battery terminals and connected them to bus bar terminals. The charger powered up and I was able to connect to it via Bluetooth.
The Lester Summit Series II charger is wired up to four 12v batteries that powers the CitiCar motor
The default battery profile was for 22001. It wasn’t all that descriptive. I went to the battery profile selector, choose battery manufacturer as “Interstate”. After being unable to find my battery model number, the app told me to contact Lester Electrical by phone. The office was closed. I left a message with technical support.
The default profile seems like it would be okay…
I looked into what 22001 was about. The profile information said it was for a 48v flooded/wet lead-acid battery pack with a 20-hour rating of 225-260 Ah. I don’t know what effect amp hour capacity has on the charging process. I didn’t know what kind of Amp Hours my batteries had.
Brand
Interstate
Model
31-ECL
Reserve Capacity (RC)
190 @ 25 amps
Guessing: 190 minutes / 60 minutes
3.166 hours @ 25 amps
Guessing: 3.166 hours * 25 amps
79.166 Amp Hours
Final Answer…
79 Amp Hours
I decided to give the default setting a go. I immediately noticed a difference in the amount of watts used to charge the battery. When using the five individual battery chargers in the past, they used a combined wattage of about 333 watts. The charger was using 1165!
The CitiCar batteries were charging up fairly quickly. It was great being able to see the current state of charge, phase, and predicted time for the charging process to complete. With the other chargers, I would have been waiting 11 hours to recharge at a rate of 0.8 miles per hour,
Towards the end of the charging cycle, I noticed that the voltage was fairly high for charging batteries at 64.1 volts (16.0 volts per battery). In the past, my other chargers would only go up to 14.5 volts on an individual battery. I went to check on the car and it sounded like the batteries were boiling. I opened the garage door as a precautionary measure to ventilate. I didn’t smell anything, but I wanted to be safe. I reached out to other C-Car owners. One confirmed that they had this issue as well and were told the batteries were okay.
The last phase seemed to drop the estimate drastically, stating 13 minutes, but was off by almost two hours. I thought maybe the temperature drop outside was having an effect on the chargers thoughts on how much the voltage needed to increase as the weather got colder. At least I now know that my batteries can hold 50 amp hours.
Time
Remaining
Amps
AH
Volts
SoC
6:52
727
20.5
1
51.9
29%
7:03
533
20.4
4
52.3
60%
7:34
505
19.8
14
53.9
63%
7:44
495
19.6
17
54.6
64%
8:33
191
9.0
29
64.1
90%
9:06
13
9.0
34
64.7
92%
9:35
3
9.0
39
64.9
93%
9:39
3
9.0
39
64.8
93%
9:47
2
9.0
40
64.9
94%
10:55
0
0
50
54.4
100%
A review of the first charge cycle
The end result was a charge that would normally take 11 hours was done in five and a half. I was charging at 1.63 miles per hour! Unfortunately it looks like the quick charge rate also increases the watt hours per mile. I’m often averaging around 280 watt hours, but the recharge from this trip was 391 watt hours per mile.
Due to the quick charge rate, I could potentially take two trips in the CitiCar per day. I could take off with Teddy to the dog park in the mornings and go for a second ride in the evenings.
One thing to consider is that the batteries were being charged for a little over an hour on the old chargers before switching over. I may have been able to shave an hour off of the charge time if they started out on this charger from the beginning. The results from the next trip may give a better baseline of what to expect in future charge times and costs.
Charging interface for Lister Charger Connect after the first charging cycle completed
I’m hoping that the over-charge voltage was a one-time conditioning of some kind. I don’t like the idea of degrading the batteries from overcharging. When looking at the logs, I suspect that this will happen every time. I’m hoping that it will consider the time from prior charges to improve the accuracy of estimated time remaining on a charge.
If everything works out well, and there is a profile for the Chevy Volt batteries, I’d like to use this charger for the lithium ion batteries as well since it has quite a lot of features through its app, and it also has extra wires to give it the ability to prevent the car from going anywhere when connected to AC power.
After the batteries were charged to 100%, the charger wasn’t registering any power on the Kill a watt meter at all. Not even a watt. It’s powered by the battery pack alone. The other chargers that I had would always draw about two watts each after the batteries were fully charged – adding to the overall cost of maintaining the battery pack that that I don’t record in my logs. They would also draw more power every now and then in the “float” phase to maintain the battery voltage over time.
In Other News
Battery investor day went well. I just wish I could get ahold of some of those new batteries for the CitiCar. It’s an interesting concept to use the batteries as structural support as part of the frame. The whole car frame of the CitiCar is already used as ground. I went ahead and put in an order for another $500 of TSLA shares in the morning.
The speedometer has trouble getting a GPS signal sometimes, resulting in unaccounted miles if I take off before it acquires its position. In addition, the speedometer does not report speed until it has a signal. The sky was clear today and I would be waiting for a minute or two waiting for the timer to catch the signal.
I suspected the last time I went to the charger, it stopped supplying power because I may have turned off the power strip. It was time to give it another go.
Five battery chargers for 12v car batteries in the back of a CitiCar
I moved the battery chargers into the back of the CitiCar. I zip tied wires going to the outlets, and made sure I could see them all face up. Everything is setup for a quick change between J1772 charging, and charging from a standard house outlet.
Teddy and I hopped into the CitiCar and took off for the charging station. Driving around with the new turn signal switch, things felt much simpler. Who would have imagined how much luxury a fully operational turn signal switch would add to a car?
The thing that got to me was that after all of the care I went through to align the steering wheel correctly yesterday, it still wasn’t aligned. I couldn’t wrap my hands at the 10 and 2 positions, and my mind kept wanting to level it off. The car pulls to the side when hitting the breaks, making the problem worse.
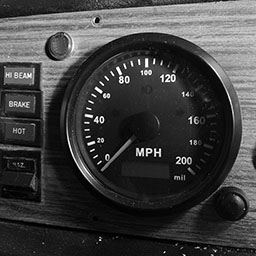
Misaligned steering wheel
Just like the last time, we saw the red Tesla and parked next to it. I connected to the charging station and confirmed everything had power before we headed over to Checkers for some lunch.
After picking up our food, Teddy and I sat on the grass in the shade of a tree. It was a great day. Nice weather, light breeze, with sounds of people and nature in the background.
The CitiCar was still charging afterwards, which confirmed my guess as to why the charger stopped supplying power the last time. It wasn’t due to a low power draw – but rather, I bumped the power strip to the off position.
I proceeded to take Teddy for a little walk. When we headed back to the car, the Kill A Watt meter showed that we got 0.2 kWh in 47 minutes. That is almost a mile added to the car. I now have a baseline to improve charging speed.
We drove over to Lowe’s and picked up some stud fasteners as a possible solution to bolt our switches and the motor controller into the car.
When I got home, I made sure the car was driving in a strait direction. I took a look at the steering wheel. I found an easier way to remove the cap without any tools. Once I took off the wheel, I rotated a plastic ring on the switch to line up with the steering wheels bolt, and placed the wheel back onto the steering column in the correct position.
Speedometer
The speedometer that I installed in the CitiCar came with a button to switch between the trip and lifetime odometer. I hadn’t installed the button yet. Instead, I’ve been resetting the trip odometer by grounding the end of the external button wire with the edge of the cigarette lighter. It looks like I’m trying to hot-wire the car when I bend down to grab the wire and line it up.
Grounding out speedometer external button wire on cigarette lighter
I decided it was time to make life simpler on myself and install the button that came with it.
Now that the charger is no longer bolted inside the car, I can stick my head in the area and look back up at the dashboard from behind. I was able to confirm that there weren’t any wires on the bottom right of the speedometer. I drilled out a 15/32″ hole, fairly slowly. The aluminum dashboard panel in the CitiCar is fairly thick.
The tricky part now was to connect the button up. The metal tabs are small. The spade connectors that I have are too large. My goal was to solder some wires onto the switch and put spade terminals on those wires.
Terminal melted off of a plastic button
Not every goal is met. I’ve been out of my thin soldering wire for some time. The terminal melted off when I began to heat it up with the tip of my soldering iron. I looked at a few videos online and found that I should have threaded the wire through the hole first, then twist it tight, and proceed to heat up the wire instead.
I found the same exact 12mm waterproof momentary push button switch and ordered aa pack of 15 with five colors. I’ll be able to make 14 more mistakes before I order more.
For now, I plugged up the hole with the defunct button. I’ll continue to use the cigarette lighter to reset the trip odometer.
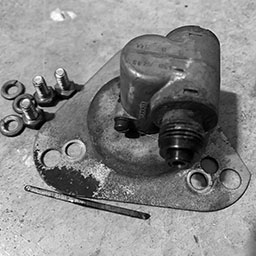
Manual speedometer gear housing for a CitiCar motor
On our lunchbreak, we started to take off in the CitiCar. There was an odor and a whining noise. It suddenly changed its pitch to be a bit more frantic. Since I removed the speedometer cable last night, I had a hunch that it was the speedometer gear housing that was still on the motor. It was probably a combination of spinning the metal shaft, the entire gear housing, or a combination of the two. After removing it, Teddy and I were zipping off to the park without any more whining.
We were followed into the park and asked about the car. A brief conversation ensured before Teddy interrupted with “Nature’s Call”. After our little walk, we then got custard where someone chimed that they had a Tesla, and thought a CitiCar wouldn’t be useful in Miami, Florida. After learning that the cars were manufactured in Florida, they clarified that they couldn’t use it on the highways.
I was able to clock in a new record at 10.3 miles on the trip odometer as we arrived back home.
High Beams
My high beams continue to turn on while driving, and sometimes on their own while parked. One of the C-Car owners shared an image of a turn signal switch that might be compatible. I found an imported after-market turn signal switch for a Triumph Spitfire 1977-1980.
CitiCar stock Lucas UK turn signal switch vs aftermarket Triumph Spitfire 1977-1980 turn signal switch
I was able to take off the steering wheel cap using a wrench. The nut underneath was not tight at all. I suspect I was following in the prior owners footsteps. The steering wheel lifted off without any effort. The turn signal switch had a screw underneath that kept it secure to the steering wheel column. After loosening the screw, the switch lifted up most of the way, but was held back by the wires. I was able to have enough room to slide it off of the steering wheel spline.
A piece of plastic that broke off of the high-beam switch
The switch was missing a piece of plastic that was later found setting inside the steering wheel columns cover. The original CitiCar turn signal switch could not be repaired.
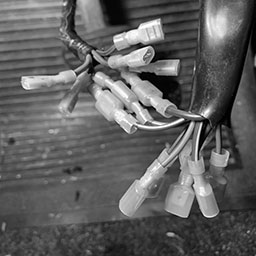
Spade connectors crimped to turn signal switch wires
I cut it free of its wires and matched them up to the new signals wires. The new switch had separate wires for the high beams, and the flash. I was able to join the two wires so that they both operated the high beams.
Once the wires were connected, I discovered that the high beams would no longer work unless the regular lights were on. I’m used to the high beams always coming on regardless if the lights are on, so it feels a little odd.
When assembling the steering wheel, I paid close attention to the self-canceling signals. This has been a problem that I’ve had in the past where the signals don’t seem cancel – or at least, not always. Now they do. I believe the prior owner didn’t pay attention to the correct orientation when putting the wheel back on the steering column. When placed upside down, you would have to turn further left/right before the signal could be canceled. Merging into lanes without much turning of the wheel would have no chance of being canceled.
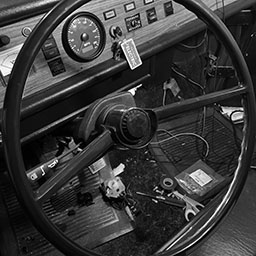
The CitiCar steering wheel with an after-market turn signal switch
In one sense, it almost feels like I have a new car. The turn signal was a constant problem where I would have to actively check often if the high beams came on, and verify that the signals switched off. I would previously go for a walk in the park and come back to see that my high beams came on, draining the battery.
Original steering wheel stalk vs after-market stalk with symbols
I really wish I could have fixed the original switch, or at least use its stalk on the new signal switch.
In Other News
The Tucson EV J1772 to Zero adapter arrived. It had the correct plug for my charger and my EVSE was able to communicate and supply power through it.
I got a phone call this morning that the part for my SUV didn’t arrive at the dealership. Saturday will be very busy, so it may not be repaired until Monday.