I’ve been receiving more products in the mail lately and figured I had better start experimenting with them before I get overwhelmed with too many things. Tonight I decided to learn how to wire up a switch to my DC-to-DC converters and light up the LED within it using the 12 volt output.
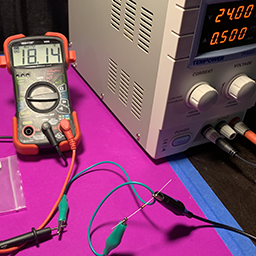
Bench Power Supply
I had quite a few adventures trying to get it setup with the buckey converter first using a bench power supply. I had experimented previously setting up the buck converter in my car after replacing some fused, but without a switch. I took it one step at a time.
Light up the LED with 12 volts from the bench power.
Light up the LED with the buck converter.
Turn the voltage regulator on and off with the button.
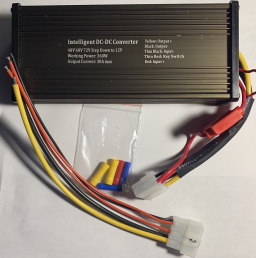
30 Amp Step down converter
I made a few mistakes, but I was able to get it working in the end. The buck transformer is only setup to deliver 5 amps over 12 volts, for a total of 60 watts. The next test was to try out a DC-to-DC step down converter capable of 30 amps over 12 volts as 360 watts. This converter was a bit special since it had a wire for a key switch.
It has a minimum of 48 volts that it will work with. My bench supply only delivers a maximum of 32 volts. The rest of my adventures were out in the garage wiring it up to my cars batteries.
I had a very difficult time with the instructions. There were two main issues that held me up. The one that held me up the most was the diagram of the key switch leading to the 12 volt output supply with yellow and black wires. The written instructions were a bit off as well regarding wire thicknesses. The actual wire harness did not match the photo on the instructions regarding red wire sizes relative to each other.
I made a few corrections and posted them here as a reference for anyone else who may be considering this device, or have already purchased it and are just going nuts trying to figure it out.
Pro Chaser DC-DC Step Down Power Converter Corrected diagram with notes
For your viewing pleasure, watch me as I tried to figure this out.
Join me on my little lab experiments. I’m setting up a system to support stepping power down from 48 volts to 12 volts with a switch that lights up. Initially using a buck converter, progressing to a converter with a key switch. These are usually used for boats, golf carts, small solar batter banks, etc. I’m using this for my tiny electric CitiCar.
I’ve been working with D&D Motor Systems to upgrade the motor on my CitiCar. I’ve gotten to learn a bit more about my car while I was gathering information to pass along to them.
I heard back from them today. They offered a motor with part number ES-40D-56, and provided an outline of the motor to review. It looked like the motor was 11.45 inches long, and 6.7 inches in diameter. It was much longer than my 9 inch motor. It will just barely fit within the space that I have available.
ES-40D-56 Motor Outline by D&D Motor Systems, Inc.
Vanguard Multi-Voltage Speed Control
One thing I noticed is the placement of terminals was different. All of the terminals are the furthest away from the motor control. Given the wires were at the exact length needed, I would need to replace them with longer wires. I’ll need to upgrade my motor controller to use the new motor, so I may just put it in the battery box next to the terminals and use really short wires. After all, I’ve seen 1D10CRACY do the same thing with his controller placement in one of his videos, and it looked like a really efficient way to set things up.
1D10CRACY: Installing the Chevy Volt batteries into the CitiCar
They asked me to make sure that the pilot on the motors mounting a plate along with the four holes used to mount the plate to the trans-axle were the same as my existing motor.
Frame where motor bolts onto axle
I must admit, I’m a bit confused about this. I’m not sure what an “A Plate” is, and I didn’t see any measurements for the pilot screws Maybe there are measurements, but I am unable to identify them. I was going to print out the outline, but I found that it wasn’t at 1:1 scale to line up with my motor or axle to compare.
The motor can run off of either 48 or 72 volts. This is great since I’ve already purchased some 48 volt lithium batteries. But now I’m wondering if I should look into a 72 volt system. The problem would be that the 48 volt batteries would sit, doing nothing. I found a few things online that have my concerned about the voltage, as well as in the motor outline itself. It seems this may actually be a 36/48 volt motor.
The price for the motor is $635 + freight with a lead time of two weeks. The price motor seems to be around the ballpark figure I was considering. I’ve got so much stuff with a long lead time, that waiting two weeks before they can build the motor isn’t going to be a problem.
Jacks holding up motor on CitiCar
If this is the same as the motor on golf cart catalog only rated for 2825 RPM, it would appear this would lower my cars maximum speed from 36 down to 26 mph. At almost half the horsepower, I imagine it wouldn’t have any pep trying to accelerate.
I’m wondering if my math is off, or if I’m just not thinking about electric motors in the proper way. I keep thinking that motors have got to be more efficient today compared to 45 years ago, but in the end, they are still composed of about the same amount of copper. I simply don’t want to buy a new motor if it’s worse than what I have. Maybe it’s the motors controller that makes all of the difference.
I asked for more information
What are the specifications? RPM/HP/Amps
What is the type? Series, shunt? Does it support regenerative braking?
Does it have a heat sensor? How hot is too hot?
Is it compatible with a speedometer cable? Is there a way to detect how fast it is spinning?
How far apart are the pilot holes in the outline?
Are there recommended controllers for this motor?
How heavy is it?
Now that they have no more need of additional details about my car, I can put the original motor back on until I have everything to replace the drive train. That thing was heavy. Maybe I should wait a few weeks…
Delayed
After a few days, I called over to the front desk. I hadn’t heard back from the engineer and I thought maybe he had sent me a standard part number that sales would have all of the specs for. Perhaps I could just go through sales to get the info I needed and order over the phone. I called in and… they paged him. He seemed friendly and all, but I felt horrible for bothering him. Just my luck, a part used in the motor has been used up, and the lead time is three to four weeks now. He explained that he hadn’t gotten to his email over the past few days to see my questions on the specs and that he’d look over it and get back, if not tomorrow, then after the weekend.
I must admit, the company seems a bit more on a personal level. I feel that most companies are a faceless corporation. With D&D Motor Systems – I’m talking with people. I’m talking with an engineer – directly – one on one. Like – me of all people… no chain of command of twenty or so managers, team leads, salesman, and what not – where details are lost and conversations are difficult to have in real-time.
On my way out to walk Teddy, I happened to walk past a box setting by the back door.
Car Radio Antenna
Car Antenna
Along with my little old car radio that I had purchased, I realized that I needed an antenna and the wiring to plug into the back of the radio. I didn’t know much about them, so I searched for things like “Classic Car Antenna”, “Antique Car Antenna”, and “Vintage Car Antenna”. I was getting mixed results. Some were overly expensive, compatible with specific cars, looked ugly, missing a few things, or just wasn’t for me. I was focused on how easy it appeared to be to install, and ideally one that could retract, either manually or with its own motor.
I finally settled on one that looked fairly new that was for vintage vehicles. I assume this is actually a reproduction, as the seller had already sold 210 of them and he claimed that it was “New”, so… yea.
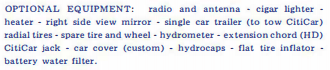
A radio was an option that could be installed for a few extra dollars on a CitiCar. Mine didn’t come with one, but there is room just above the accessory light where it appears that the radio would go. I’ve seen a few photographs where the antenna is close to the front bumper beside the passenger headlight, and another where it’s close to the windshield.
Upon further inspection of various photographs, I noticed that one had a CitiCar badge where another had a radio. I’ve had a loose “Sebring Vanguard” plastic plate that came with the car, but I was unsure where it should go. I looked pretty close at the blank area and noticed some faint residue from the adhesive on the back of the plastic plate.
Once I get the radio, I’ll have the parts needed to experiment with. Hopefully I can get it operating. I don’t know anything about cars, but I do know a bit about electrical diagrams and pin outs.
I’ve been in contact with D&D Motor Systems, trying to upgrade the motor I have with something that is a bit stronger, speedier, and possibly with some regen capability.
With all of the information I had available, it just wasn’t enough without taking the engine off and going in for a look inside. I reluctantly went ahead and pulled the engine off today.
CitiCar motor on scissor jacks
It was a bit of a long drawn out process, disconnecting cables and wires, photographing and making videos of what went where. The hardest part was at the tail end where it was time to take the motor off.
At one time, I had three separate jacks that I was using. Two were scissor jacks, and I also had a trolley jack. With all of this, I still felt as if I didn’t have the correct equipment for the job. Wiggling the motor out was a fairly difficult process. After some time, the motor gave way and oil spilled out of the axle.
I now had a motor standing free on some jacks. I wasn’t able to move it back any further since the speedometer connection was still on the back. I started lifting it, but it felt as if it was catching on something. The motor is very heavy, I started to set it down, but the scissor jacks fell over. I did my best to lower it to the floor.
CitiCar motor shaft
I took a few measurements, counted 10 teeth, and then I was off to work out the gear ratio. I found a clip that I could put onto the shaft and setup my camera to look directly at it. I then went to the back of the car, marked each tire with a line of chalk, and spun both tires 10 times, calling out each revolution. It turned out to be 68.3 revolutions, which works out to be a gear ratio of 6.83:1.
Finding the gear ratio for a CitiCar
With a gear ratio of 6.83:1, my assumption is that there are 41 teeth meeting up with 6 – witch would actually be a ratio of 6.83:1, where it has an infinite number of trailing 3’s. I thought at least one of the numbers on the axle would have indicated the ratio, the number of teeth on the shaft, and what type of shaft it was.
Numbers on axle
This ratio was not recognized on the CitiCar wikipedia page. It listed earlier models with a ratio of 7.125:1, and later models with a ratio 5.17:1. The page also indicated there was a “hilly” option on the transitional cars with a higher ratio than 5.17:1 at a cost of speed, but didn’t specify what it was. A NASA article (NASA TM X-73638, October 1976, page 32) had mentioned a different ratio of 6.83:1 on their car, and a maximum speed of 32 mph.
Once I realized my gear ratio matched the one that NASA had, I was certain what the hilly ratio was, and that I had it. I’ve been in a similar situation trying to get up to 33 on level ground, but just recently found that my speedometer is four miles too fast as well.
CitiCar axle shaft
I went ahead and added the new ratio for the hilly option on the Wikipedia CitiCar page and referenced the NASA article. I may start making additional changes over time. I’ve got a treasure trove of documents, books, and links pertaining to the history of the CitiCar.
It’s been a long day. I’m tired. My goal has been completed. I’ll put the motor back on tomorrow. I had purchased a few items prior to replace the axle gear oil. I just wish I had played it a bit safer and be prepared for oil to come out. I suspect someone may have put too much inside. I’ll end up flushing it all out. I have no idea if the weight matches what I have, or how old it is.
Maximum Speed
CitiCar Speedometer
Let’s have a fun exercise to determine the maximum speed at which everything is rated.
The motor is rated for 4000 rounds per minute (RPM)
The gear ratio is 6.83:1
At 4000 RPM, tires would spin at 585.65 RPM.
I’m using 125R12 tires (the original stock size) with an overall diameter of 20.39 inches. The radius is 10.195 inches. Solving the the circumference (2 π r), I get roughly 64.06 inches.
One tire revolution would consist of traveling 64.06 inches. In a perfect scenario, this is only possible without any load, car, or gravity to make the tire… smaller.
585.65 revolutions per minute would travel at 37,516.739 inches per minute.
Unit
Per Minute
Per Hour
Inches
37,517
2,251,004
Feet
3,126
187,584
Yards
1,042
62,528
Miles
0.59
35.53
The combination of the motor, axle, and tires only permits the vehicle to drive at a maximum speed of 35½ mph.
Keep in mind, this doesn’t take a loaded radius, air pressure, or rolling circumference into account.
I’ve been talking with a few people in CitiCar and Comuta-Car groups and to someone at D&D Motor Systems to replace the motor that I’ve got. The model numbers of the motor and axle that I have do not provide enough information alone.
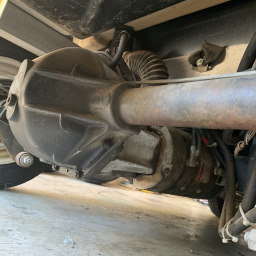
Dana spider axle and motor on a CitiCarv
For anyone going down the same route, here are the numbers that I see, that you can use for reference. The motor has some details on its plate, but some of the details are worn. I am unable to see the serial number at the moment:
GE 6HP Series Wound 48v DC motor plate
Manufacturer
General Electric
Voltage
48V
Wound
Series
Horse Power
6
RPM
4000
Amps
125
Class
F
Time Rating
INT
Model
5BC 49 JB 327 C
Motor plate information
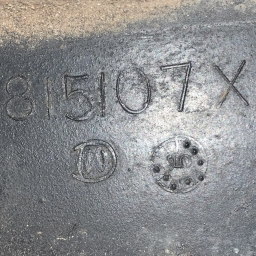
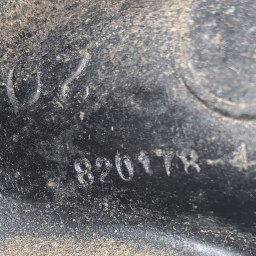
Numbers 815107X and 5 on a Dana Axle
Numbers 20 and 820178-4 on Dana Axle
Numbers 820178-4, 5, and 20 appear on the axle. Another number appears as 815107X, but it may also be 8/5/07X or 8/5107X or 8/5107X.
The number five appears in the center of a circle, tilted on its side, with eight dots around it in odd positions filling eight of ten spaces.
There is also a letter “D” with a letter “W” inside of it.
I need to pull the motor off of the Dana spider axle to see inside and identify the motor coupler, spline, or shaft it will need. I’m not at all a car guy, but that’s the lingo I keep hearing. I’ll just pull it off, snap a few pictures, count things, and make some measurements with my calipers. How hard can it be? After all, I’ve watched David Brunson install a motor on his Comuta Car, so I’m certain that I am an expert mechanic now.
I wasn’t sure if removing the motor involved axle oil spilling out. I was told no, but then a few people chimed in and started offering tips on how to replace the axle geese. I figured while I’m working in that area on a 40 year old car, what bad could come from fixing something that ain’t broke? It felt like general maintenance that should be done every X-thousand miles or X-years, whichever came first. Sure enough, the owners manual had something to say about it:
The 1976½ CitiCar Owners Manual
SIX MONTHS AFTER PURCHASE AND EVERY SIX MONTHS THEREAFTER
Check differential fluid level. Use 90 weight Hypoid gear oil. Fill to top. In cold weather lighter weight fluid may be used. It is not advisable to mix different weights. When changing types of oil, flush system. Use no lighter than 30 weight oil.
I’m under the impression that the “every six months” is just topping off what’s already there, but this thing is so old, I’m wondering what I’ll find inside. I think I can just drain the fluid and fill it back in. If I need to crack it open, I’ll have everything on hand, just in case.
I previously had no clue what a differential was, but apparently it is something inside the rear axle. I watched a video by CitiCar Tom rebuilding his Terrell differential for a different axle than mine. I watched another about replacing differential fluid and ordered everything I didn’t already have, and got a nice 20% discount.
Supplies
Part #
Price
Discount
Mobil 1 Synthetic Gear Lubricant LS 75W-90, 1 Quart
26101
$13.99
$2.80
Permatex Ultra Black Maximum Oil Resistance RTV Silicone Gasket Maker (3.35 oz)
82180/82150
$8.49
$1.70
Performance Tool Multi Use Pump
W1145
$16.99
$3.40
CRC Brakleen® Break Parts Cleaner Non-Chlorinated (14 wt. oz.)
5088
$3.59
$0.72
FloTool Standard Duty 7 Quart Drain Pan
OP-112EMI
$3.49
$0.70
TEQ Correct 2 Ton Hydraulic Trolley Jack
TQ924
$41.99
$8.39
$88.54
$17.71
Order from Advance Auto Parts
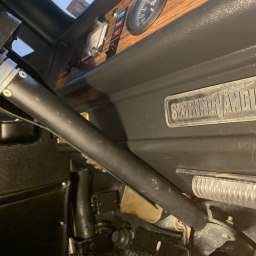
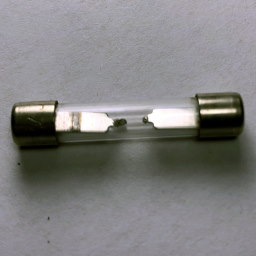
DC to DC
Buck converter and 12v socket
The other night, I had a few supplies come in. One was a DC-DC Buck converter from 24/36/48v to 12v. I was hoping I could hook it up so that it would work in both the 48 and 24v mode that the car runs in.
I had two sets of wired 12v sockets. I cut one of them in half and spliced the buck converter into the middle. I ran down to the car, hooked everything up and saw/heard an unexpected spark as the wire made contact. Nothing blew up.
I also got one of the cheapest 12v car devices I could find that was still a little useful, but I wouldn’t mind having it blow up if something I did would destroy it. I found a volt meter with 2 usb ports. I plugged it in and it showed 12.7 volts. Everything worked in both the 24 and 48 volt configuration.
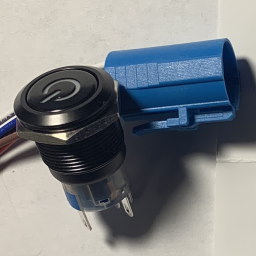
Given that I saw the spark, I knew this would always be on, even when nothing was plugged into it. I went ahead and placed an order for a fancy latching switch button that lights up when the power is on. It comes with a pre-wired socket, and I believe I can setup the LED to run off of the 12v supply while the 48v power only flows through the switch itself.
In the mean time, I installed the other socket onto my accessory battery.
Dual USB Car Charger 4.8A Output Cigarette Lighter Voltage Meter
$9.99
19mm 3/4″ Metal Latching Pushbutton Switch 12V Power Symbol LED
$9.99
GPS Speedometer
The T600 has connected to Skynet
I purchased a little T600 Universal GPS Smart HUD. This thing is more of a curiosity to play around with, but I got it because I needed a battery monitor, and I like some of the features it came with.
This thing feels and looks cheap. It simply gives you the bare bones of features it advertises. The most fancy display has a round swoosh below your current speed.
I had to configure it first to bring the speed adjustments down to 100% and offset to 0 mph. I also played around with the three colors that it shows text in.
Speed
Speed Alarm
Distance
Voltage
Voltage Alarm
Duration
Cardinal Direction
Altitude
Clock
The features I like of the T600 Universal GPS Smart HUD
Leaving Home
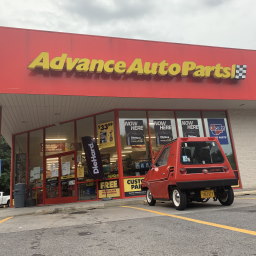
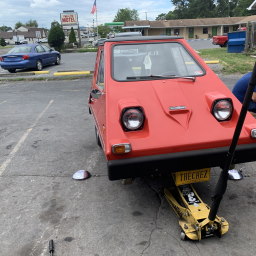
CitiCar at Advance Auto Parts
Teddy and I started our trip to pickup some supplies to change the cars axle oil, and to pull the motor off to take a closer look at the spline for the shaft of a new motor. As we pulled into the parking lot, there was a police car strait in front of us. Sometimes I think they are going to make up an excuse to pull me over just so they can have a closer look.
Teddy waits to take off on another ride
We wern’t at the store for too long, as it was an online order for pickup. It started to rain a little when we took off. I took Teddy over to Gertrude Miller community park on the way home. It got really dark, windy, and rainy very quick. I started wondering if the wind was strong enough to blow the car over.
Our first trip in the rain
The trip home was… interesting. The roads were wet. The rain was pretty hard. I had the wiper running along with the lights. I saw my voltage on the accessory battery was down to 12.0v. I even tried the defroster to see if I could defog the window. When I turned on the fan, I didn’t feel any air coming through the window vents. The simple fix was to use my hand to wipe down the window. I’ll have to look into what I can do to defog the windows later.
Dead after arrival
As we pulled into the garage, I turned off the lights. Since I was playing with the GPS HUD, I flipped the switch for the lights back on and see how much they impact the accessory battery.
Nothing.
I suspected that a fuse had blown. I grabbed my multi-meter and tested all seven for continuity. I found the bad apple. When I matched the position up to the cover plate, it was labeled as a fuse for the break, turn signal, and horn. I turned on my turn signal and it worked. I pulled out the fuse… still works. I’ll need to re-label these fuses later. Even if I was reading the panel upside down, the other label indicated it would have been the controller.
Luckily for me, one of my first investments in the car was to purchase a variety of fuses and throw them in the back of my car. The cover plate indicated a 20 amp fuse would be adequate for the lights. I replaced the fuse, and all was well with the world.
I took a look at the burnt out fuse and noticed it was rated for 30 amps! My speculation is that the previous owner put that in there because they got tired of replacing 20 amp fuses. Since this happened at the tail end of the trip, I’m guessing that the wiper motor had too much trouble as I entered the garage. Since it wiped away all of the rain, there was a great deal of friction to continue.
In the meantime, I have a DC fuse block on order with sticky labels and LED’s that light up when a fuse is blown. I’ll add the lights and windshield motor to my list of things to upgrade later.
Accuracy
Regarding the GPS HUD, there were a few things enlightening about it. The speedometer on the car was reporting 4 miles faster than what I was actually traveling at. I was able to set my phone next to the GPS monitor and confirm its accuracy. I thought I was going amazingly fast the other day pushing the car to 33.5 mph, only to realize now that I was going under 30.
On a related note is that the distance I have driven on the odometer is much higher than this new gadget is reporting. There seems to be a large discrepancy in just a few short miles. When I punch my routes into Google Maps, It’s sitting in the middle of the other two.
Waypoint
Odometer
Distance
T600
Google
Home
1,088.9
Advanced Auto Parts
1,093.0
4.1
3.5
3.7
Gertrude Miller Park
1,094.2
1.2
1.0
1.1
Home
1,097.4
3.2
2.8
3.0
Total
8.5
6.3
7.8
With the battery voltage meter, I felt better to see how the lights and a wiper affected the voltage with a general idea of the batteries health. I would still prefer to see a capacity meter of some kind with a percent, colors of red/yellow/green, and a bar showing how much is left.
I used the altitude feature to get an idea about how high the hill is to get out of my little neighborhood. The top of the hill is at 648 feet above sea level, and the lowest point is at 508 feet. Every time I go on a little trip, I’m starting out with a 140 foot tall hill.
I know it’s super cheap, but here are some other things I wish it had
A separate set of leads to connect to your battery – monitor 48v battery voltage while connected to a dc-to-dc 12v converter
A switch to turn it on
Buttons on the front
Better sticky pad. It keeps pulling up from the dash
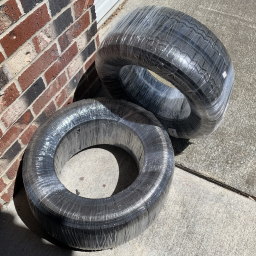
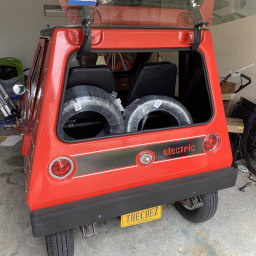
After having the extra set of tires that came with the car mounted, I noticed the CitiCar had a much smoother ride with radial tires. Unfortunately, I could hear them rub as I turned into my driveway while the car experienced a little bump.
It was time that I get serious and invest in the stock size that the car was intended to operate with. The consumer information 1976 CitiCar sheet that the original dealer provided with the CitiCar had recommended tire sizes of 4.80×12 inches and 125-SR12-ZX. My current tires (155/80R12 77T) are an inch too wide. They are a bit larger in diameter as well. One of the members on a CitiCar and Comuta-Car group had just gotten some tires for his car recently, and I went ahead and ordered the same set for myself.
It didn’t take long before I noticed they arrived at my doorstep while I was leaving the house. It felt like Christmas looking at those wreaths. I stored them in the garage for a few days until I was ready to get them mounted.
The big day came. The tires were small enough that I was able to fit all of them in the back of the cheese mobile. I drove over to Advanced New & Used Tires and they were able to work on the car as soon as I got there.
We talked a bit about the car regarding its history, maintenance, and its value regarding costs as a hobby versus the actual value someone would pay. I think he may have been considering purchasing the CitiCar, but I made it clear that it wasn’t for sale.
It wasn’t long before they were done mounting the new tires, and they knocked $20 off for coming back so soon. My garage is now storing two sets of unused tires.
I no longer hear rubbing when turning into my driveway, and the tires are still smoother than the original tires that came on the car.
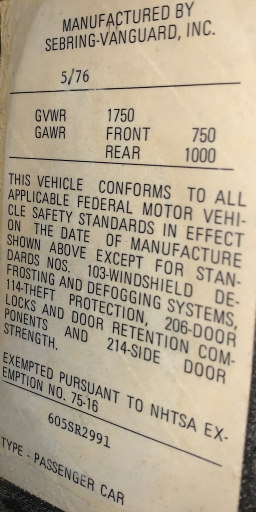
Label on side of CitiCar dash with Gross vehicle weight rating and gross axle weight rating
One thing I noticed is that the maximum load weight is lower than the original tires, and previous set of tires. I had some concerns until I checked for the vehicles gross vehicle weight rating, and the calculated the sum of all tires.
Since the vehicles gross vehicle weight is less than the four tires combined. The sticker on the side of the dash indicates the front axle can support 750 lbs, and the rear supports 1000 lbs. My new tires can support both axles at their maximum weight load.
I’m assuming it’s fine. Also related to the weight of the car, lead acid batteries weight a lot. I believe around 600 lbs. I’m only using roughly half the battery capacity as the ones that originally came with the car. I’ll later be replacing the lead acid batteries with some lithium batteries I’ve purchased as well, which is even more lighter.
Tires
Speed Rating
Max PSI
Max Load
Total Max Load
Original
B: 31 mph
60
780 lbs
3,120 lbs
Extra Set
T: 118 mph
44
908 lbs
3,632 lbs
New Tires
S: 112 mph
51
584 lbs
2,336 lbs
Gross Vehicle Weight
1,800 lbs
Each set of tire statistics against the vehicle itself for comparison
I had started keeping a better track of charging time and voltages on the last trip. Based on the number of miles driven, I estimated that it would take eight hours to charge, and set an alarm for an hour earlier. Much to my surprise, the batteries were fully charged when the alarm went off.
Waypoint
Odometer
Distance
Home
1,084.2
Advanced New & Used Tires
1,086.6
2.4
Home
1,088.9
2.3
Total
4.7
CitiCar odometer readings for a round trip to Advanced New & Used Tires
I’ve had quite a bit of fun driving the CitiCar. I want to go further, and a little faster up hills. The main drawback on range is that the battery capacity in my car is very low. I could upgrade to a proper set of batteries to match the manufacturers recommendation, but I would be shelling out one to two thousand dollars based on quality and composition. However, if I am going to upgrade the motor as well, I should wait on the batteries until I’ve chosen a motor, as it may need a different voltage. Both options are costly, and doing both doesn’t seem to make sense. If I go for the batteries, there is a chance I will not upgrade the motor unless it fails, and then the battery voltage of what I already have will heavily dictate what motor I will get.
After doing a bit of research, I grabbed a can of WD-40, a ball of metal, and a soft towel. I spend the next two hours cleaning up my hub caps last night. I rubbed off the rust, and buffed them with the towel.
Four new radial tires were thrown in with the sale of the CitiCar. After having my fun with the old tires, I decided it was time to take the car into a tire shop and have the new tires installed. I found a local shop nearby and called ahead to verify that they would install third party tires. They had a few questions, but the best way I could explain was – it’s a weird little car with trailer tires, along with the code of the new tires.
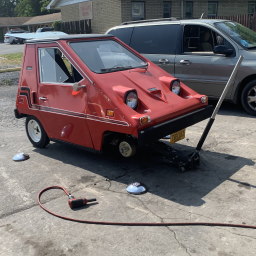
CitiCar jacked up by its front axle for tire installation.
There was only enough room in the back for two of the tires. The other two went into the passenger foot-well. While it was lifted on jacks, a few people waiting to be serviced came over to talk about the car, the manufacturers history, and current condition.
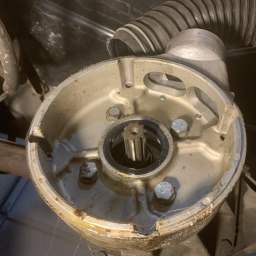
I got to see the drum brakes on the back of the car for the first time. They were dirtier and different than the front brakes. The adjustment access point faces out toward the tire, instead of being accessed from behind. The axle caps protruding from the center of the front rims were missing on the back two tires.
Once the tires were installed, the mechanic and I were able to put all four of the older tires into the back of the car. I took a look at the new tires on the car. Because they were a bit larger, I rotated them in both directions to verify that they didn’t rub against the cars body.
The bill came out to $60.90.
Waypoint
Odometer
Distance
Home
1,055.8
Advanced New & Used Tires
1,058.2
2.4
Home
1,060.5
2.3
Total
4.7
CitiCar odometer readings for a round-trip to Advanced New & Used Tires from home
Today I started breaking out the individual steps and evaluation of the brakes. I improved the rotation of the front driver-side tire, and gained some insight of how things are put together, and why. Specifically, the front tire was on backwards and had a contributing impact to the problem.
I have setup a page under the maintenance section for brakes.